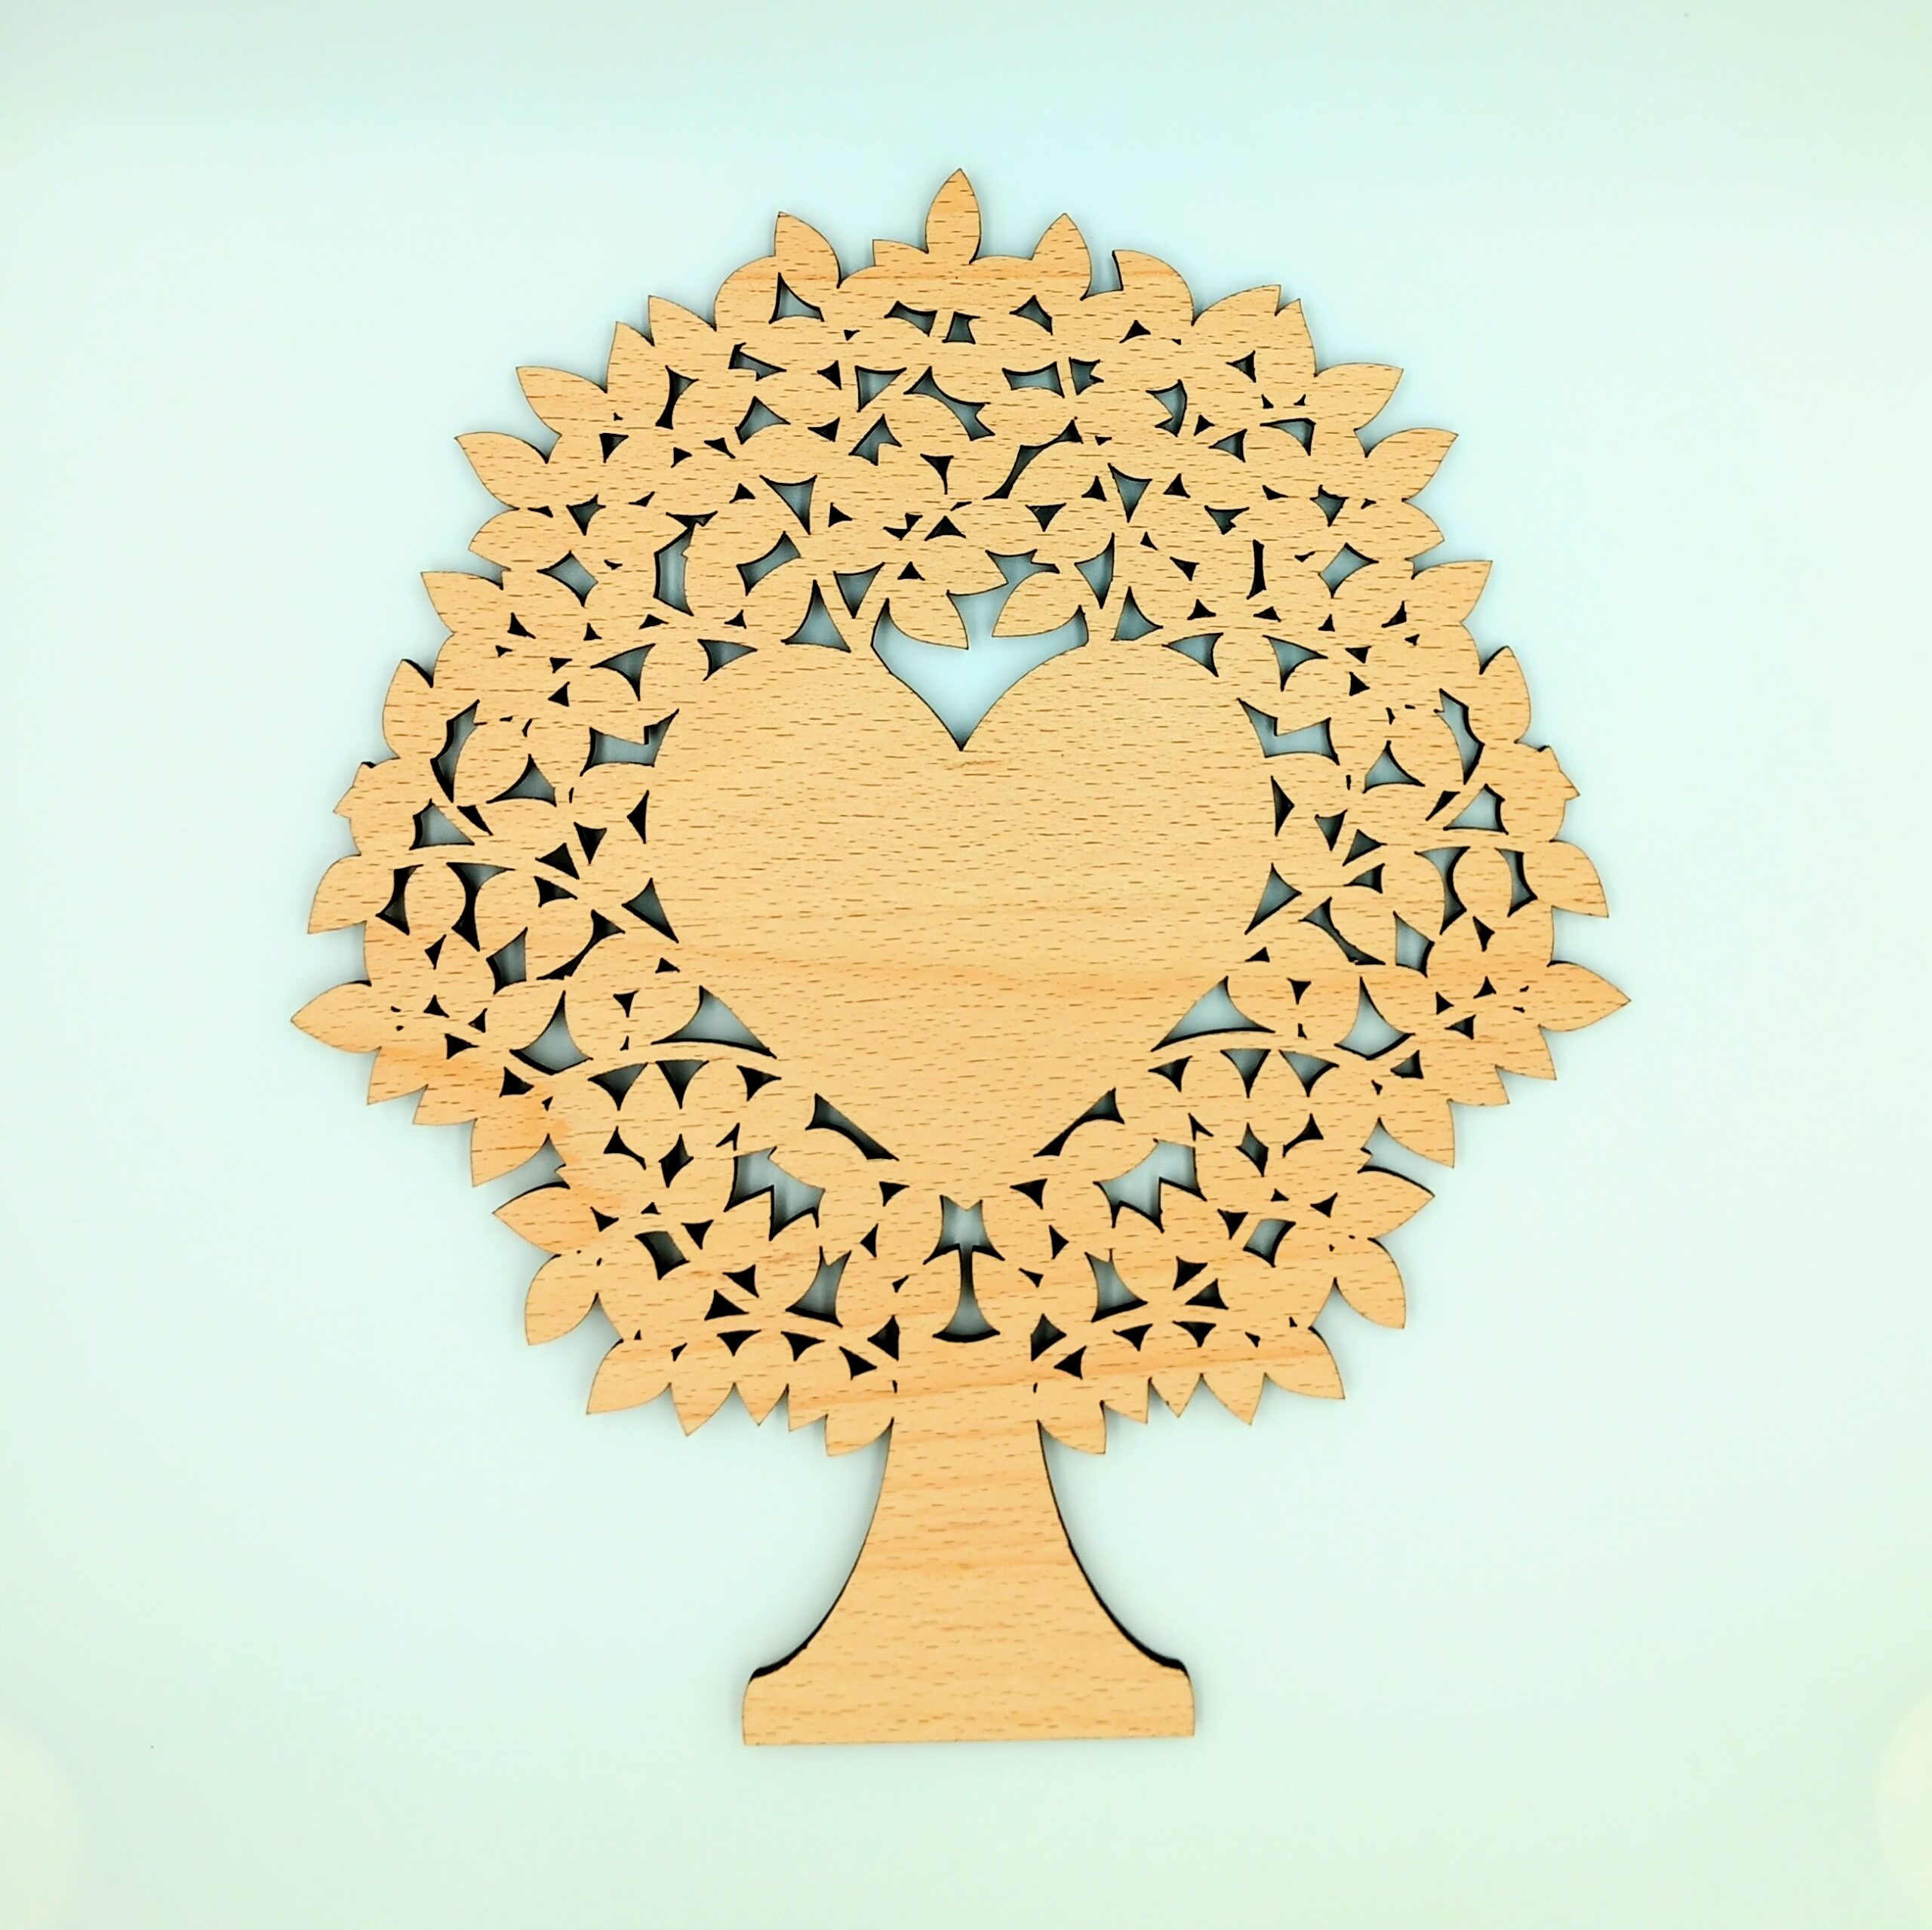
Today I’ve been making laser-cut blank family trees for pyrographers to customise, and this is the 1-heart blank pyrography family tree, below.
I’ve done the hard part (cutting out the fiddly shapes) so that pyrographers can do the fun part of burning names or messages into the heart in the middle.
Soon I’ll be putting them on sale, but this is just a sneak preview of what they look like. I didn’t put anything in the photo to show scale, but this one is about 20cm wide by 23cm tall. Here’s a video I put on TikTok, which has my hand in it for scale:
This is the latest piece I’ve been commissioned to make – a ‘new baby’ keepsake gift. It’s a laser-cut wooden heart with the baby’s name and date of birth, and I’ve also spelled out the baby’s name in the little wooden blocks. The customer who commissioned it requested “NO STORKS!”, so I’ve created a stork-free design:
(No idea why there are fuzzy bits in the image. Maybe I need to clean the phone’s camera lenses. Anyway, you get the idea.)
I tried to incorporate lots of baby-themed elements but without being too sickly sweet. See how many you can spot! (Did I miss any traditional baby-related themes? You can use the comments section below to let me know what I should add next time.)
(And is it just me, or does that dummy look like it’s got eyes and a smiling mouth?!)
I like the filigree-type feel of this design. It feels a bit more special and delicate than just etching a design or message onto a solid sheet of wood.
I think it also has elements in common with some of my other work, like the wedding heart woodcut
That wedding heart is now on my TikTok shop, but I still need to upload the new baby keepsake gift woodcut to the TT shop.
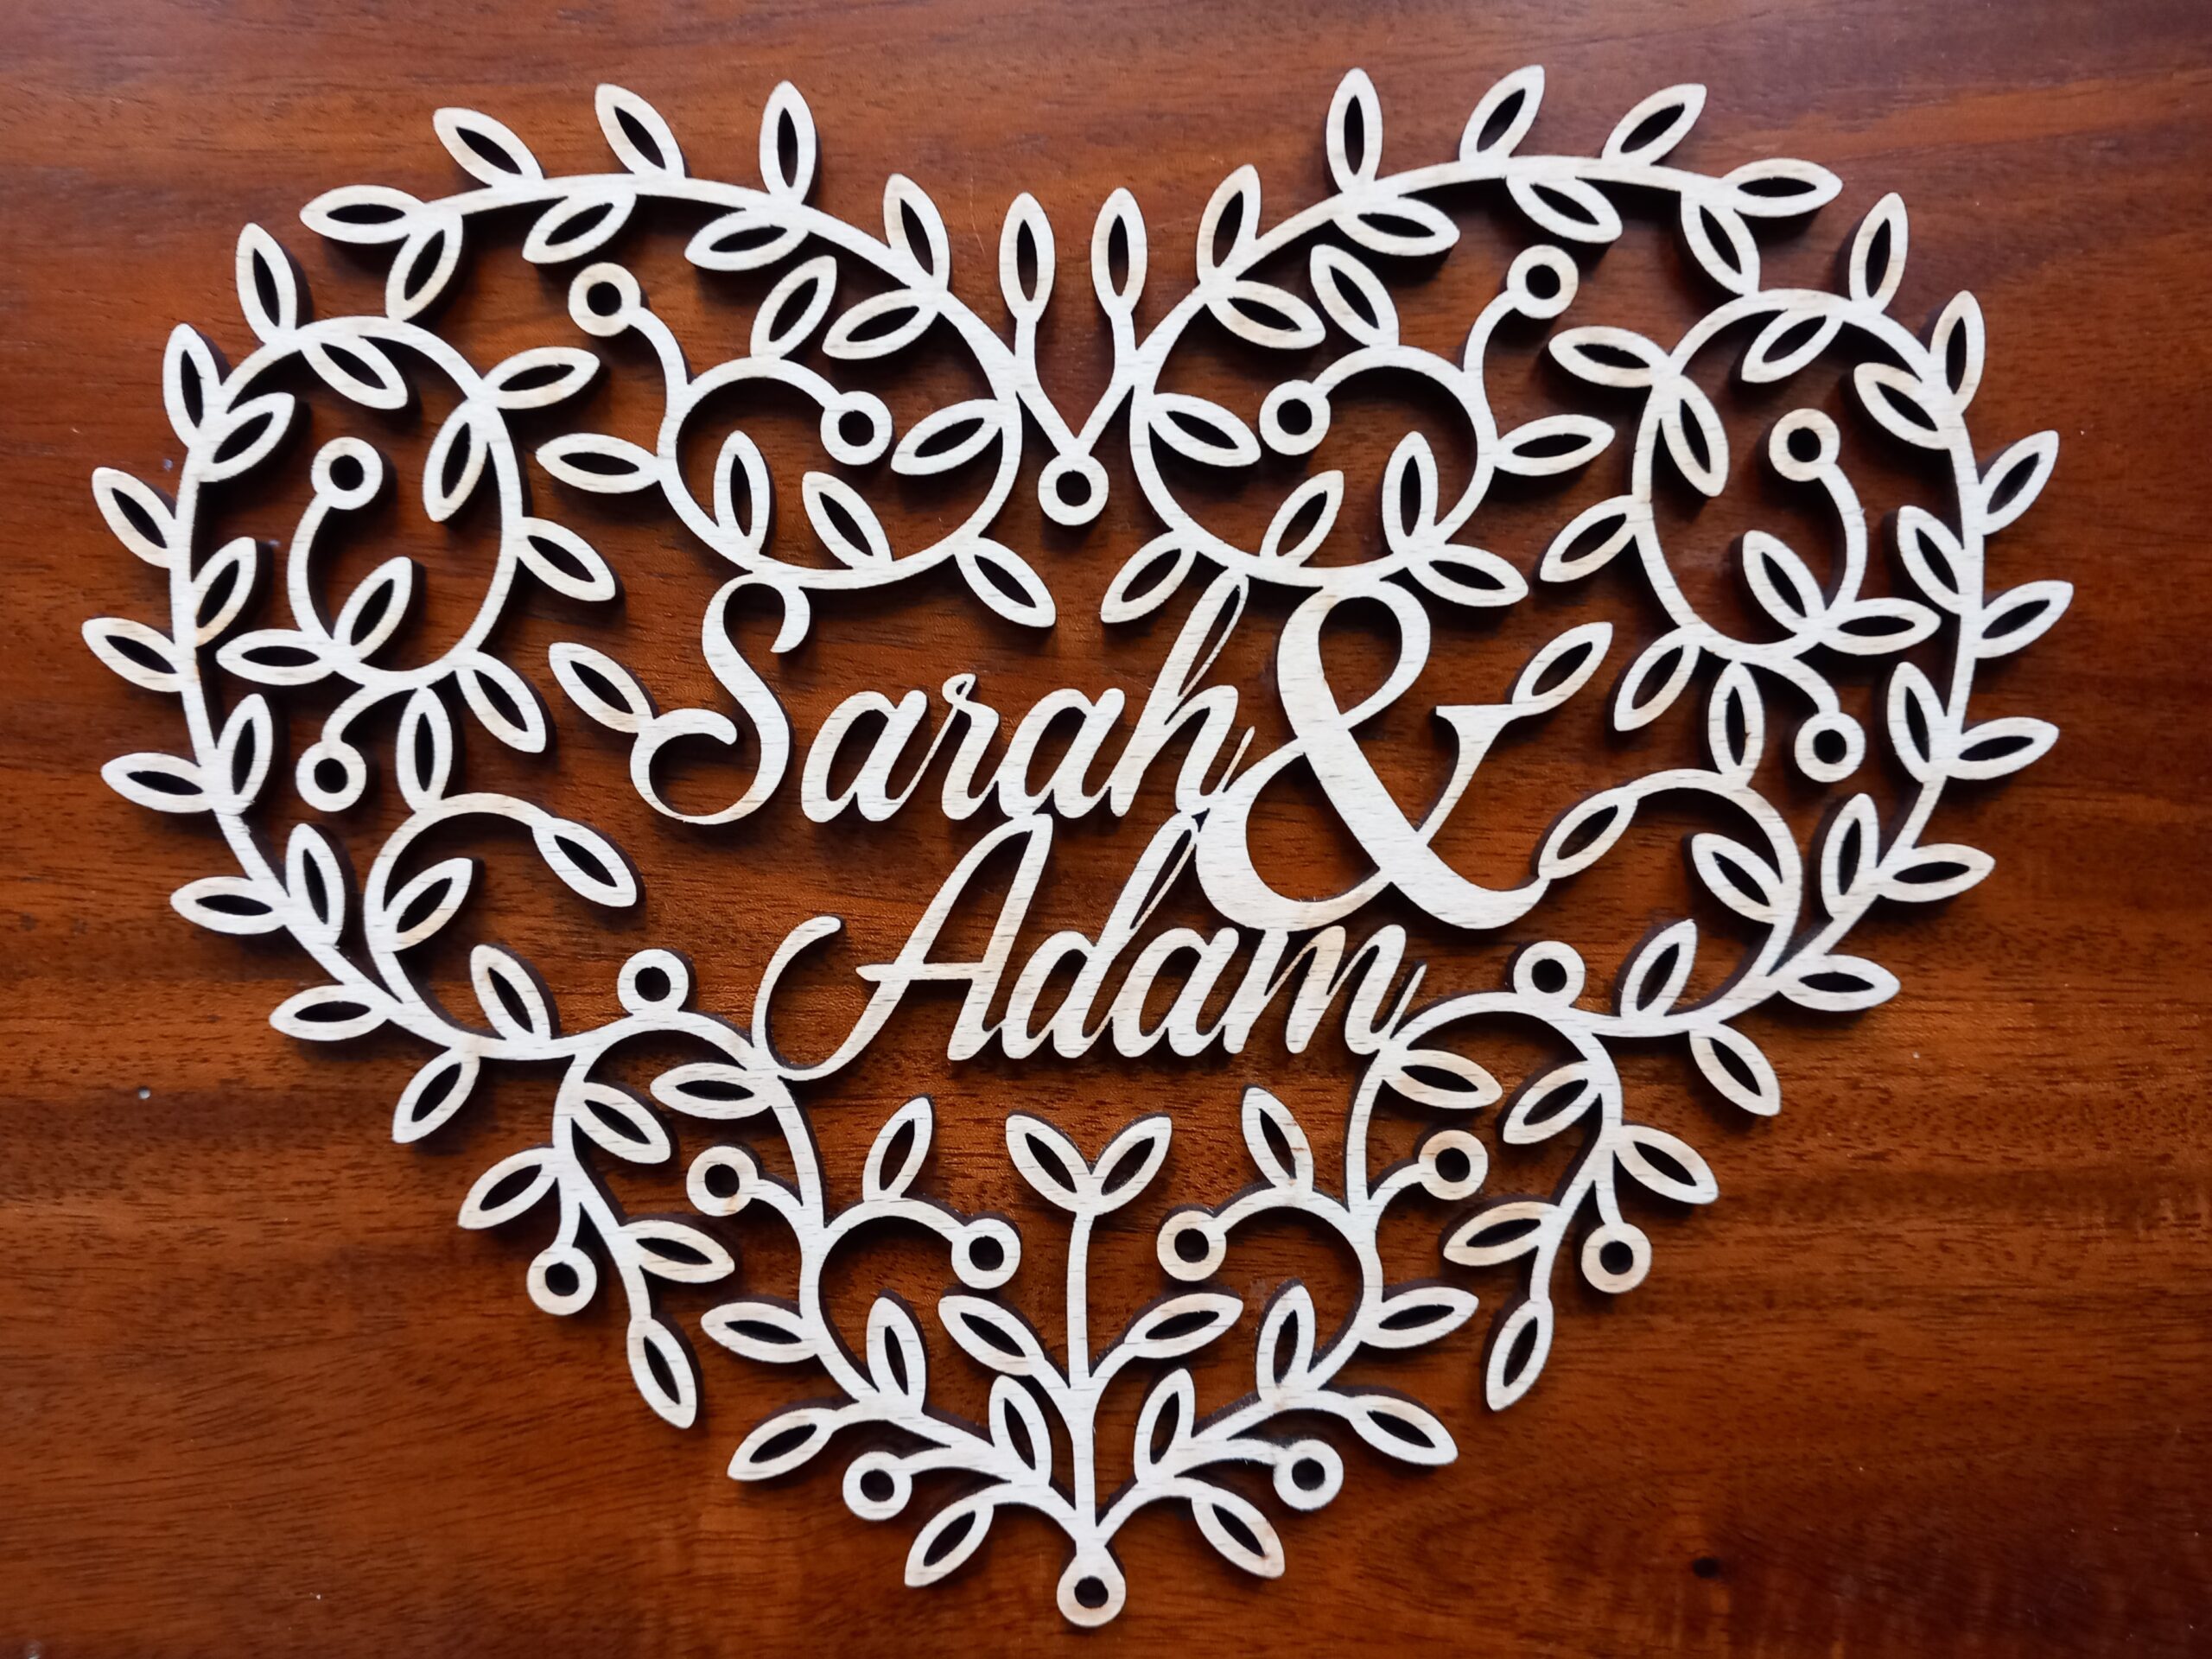
Following on from yesterday’s papercut Valentine heart design, I have now cut the same design, to get a filigree Valentine heart woodcut:
Here is a YouTube video of me cutting it with the laser machine (an Epilog Fusion Edge).
I’m really pleased with how these look – either as papercuts or from wood, and at small or large scale.
In fact, I’m so pleased with the design that I’m going to put it for sale on my shop. Woohoo! Or rather, Woo Commerce!
While cutting this I was listening to the audiobook of Joanna Penn’s newly-released “How to Write Non-Fiction” (second edition). There are a LOT of useful tips in there, which I will hopefully be putting into practice later this year. I am feeling very creative at the moment, and so 2025 seems like I might be able to plan ahead far enough to actually start achieving some goals.
I’ve got loads of projects and designs that I’m working on, so I hope they all turn out as well as this design. This is what the filigree hearts look like when they’ve been cut out and are hanging up on a wall:
Do you like the design? Could I improve it? Let me know in the comments below!
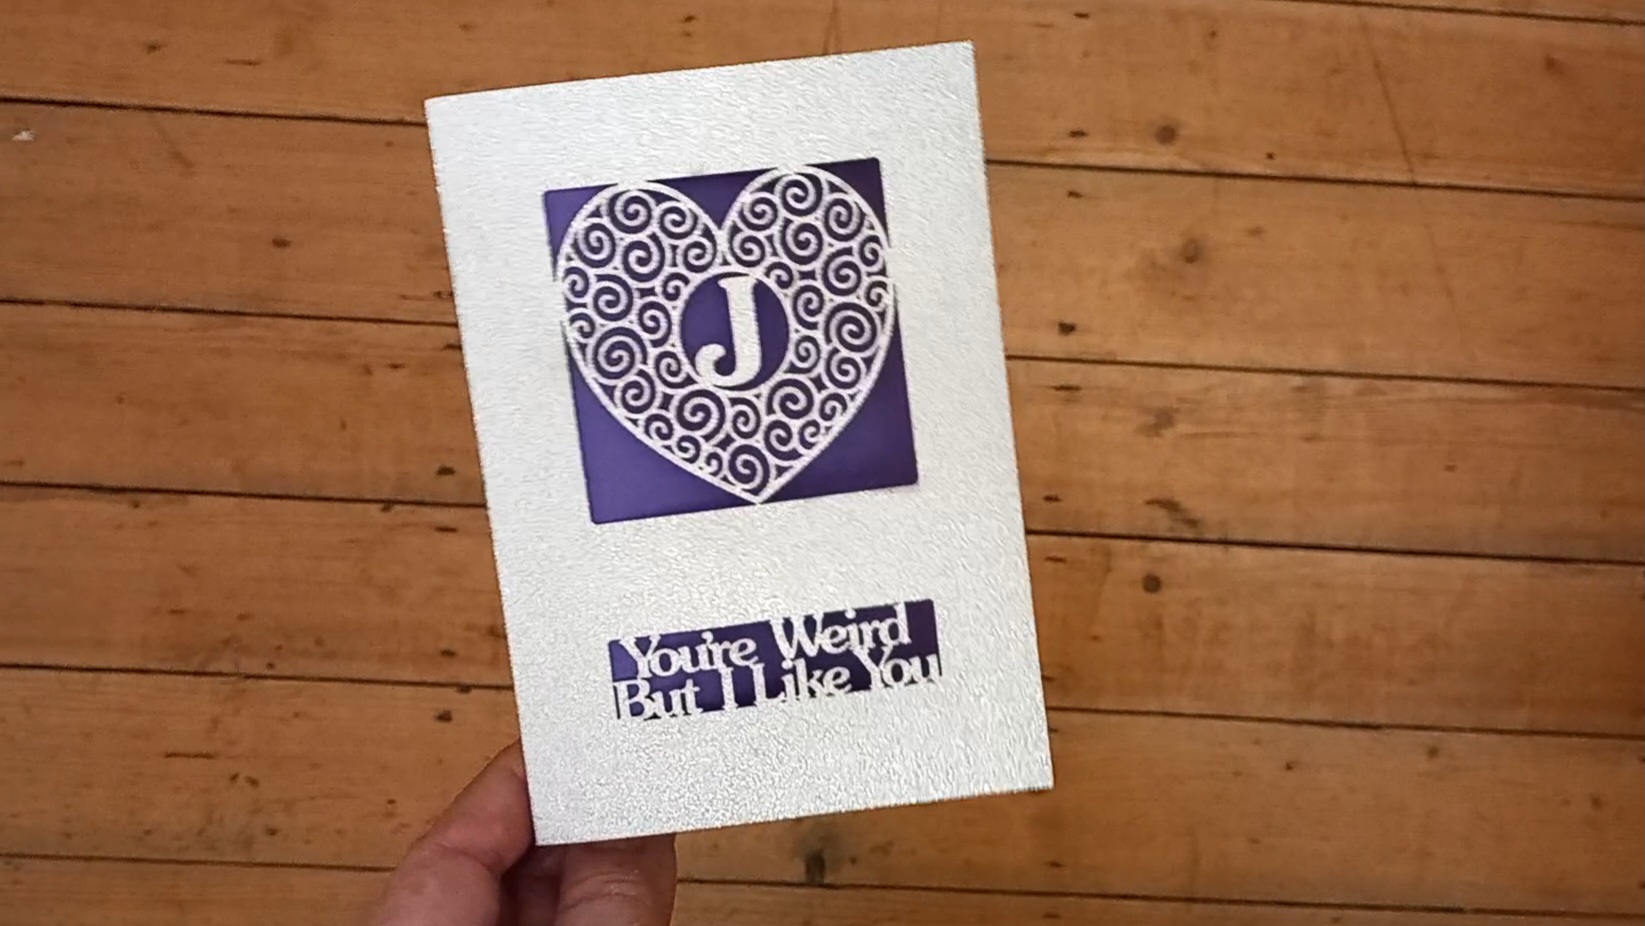
For people who don’t like the yucky sentiments of standard Valentine’s Day cards, here is an experimental version of a non-mushy Valentine card. This is another laser-cut card, cut by my Epilog Fusion Edge machine.
It’s got all of the twiddly filigree bits of a laser-cut card, but without the saccharine sentiment 🙂
Although now that I think about it, I didn’t put any particularly sweet sentiments on my personalised letter ‘A’ card, either. Maybe I’ll try to come up with a non-heart version next, to make it as unsentimental as possible. That would be the ultimate non-mushy Valentine card 😀
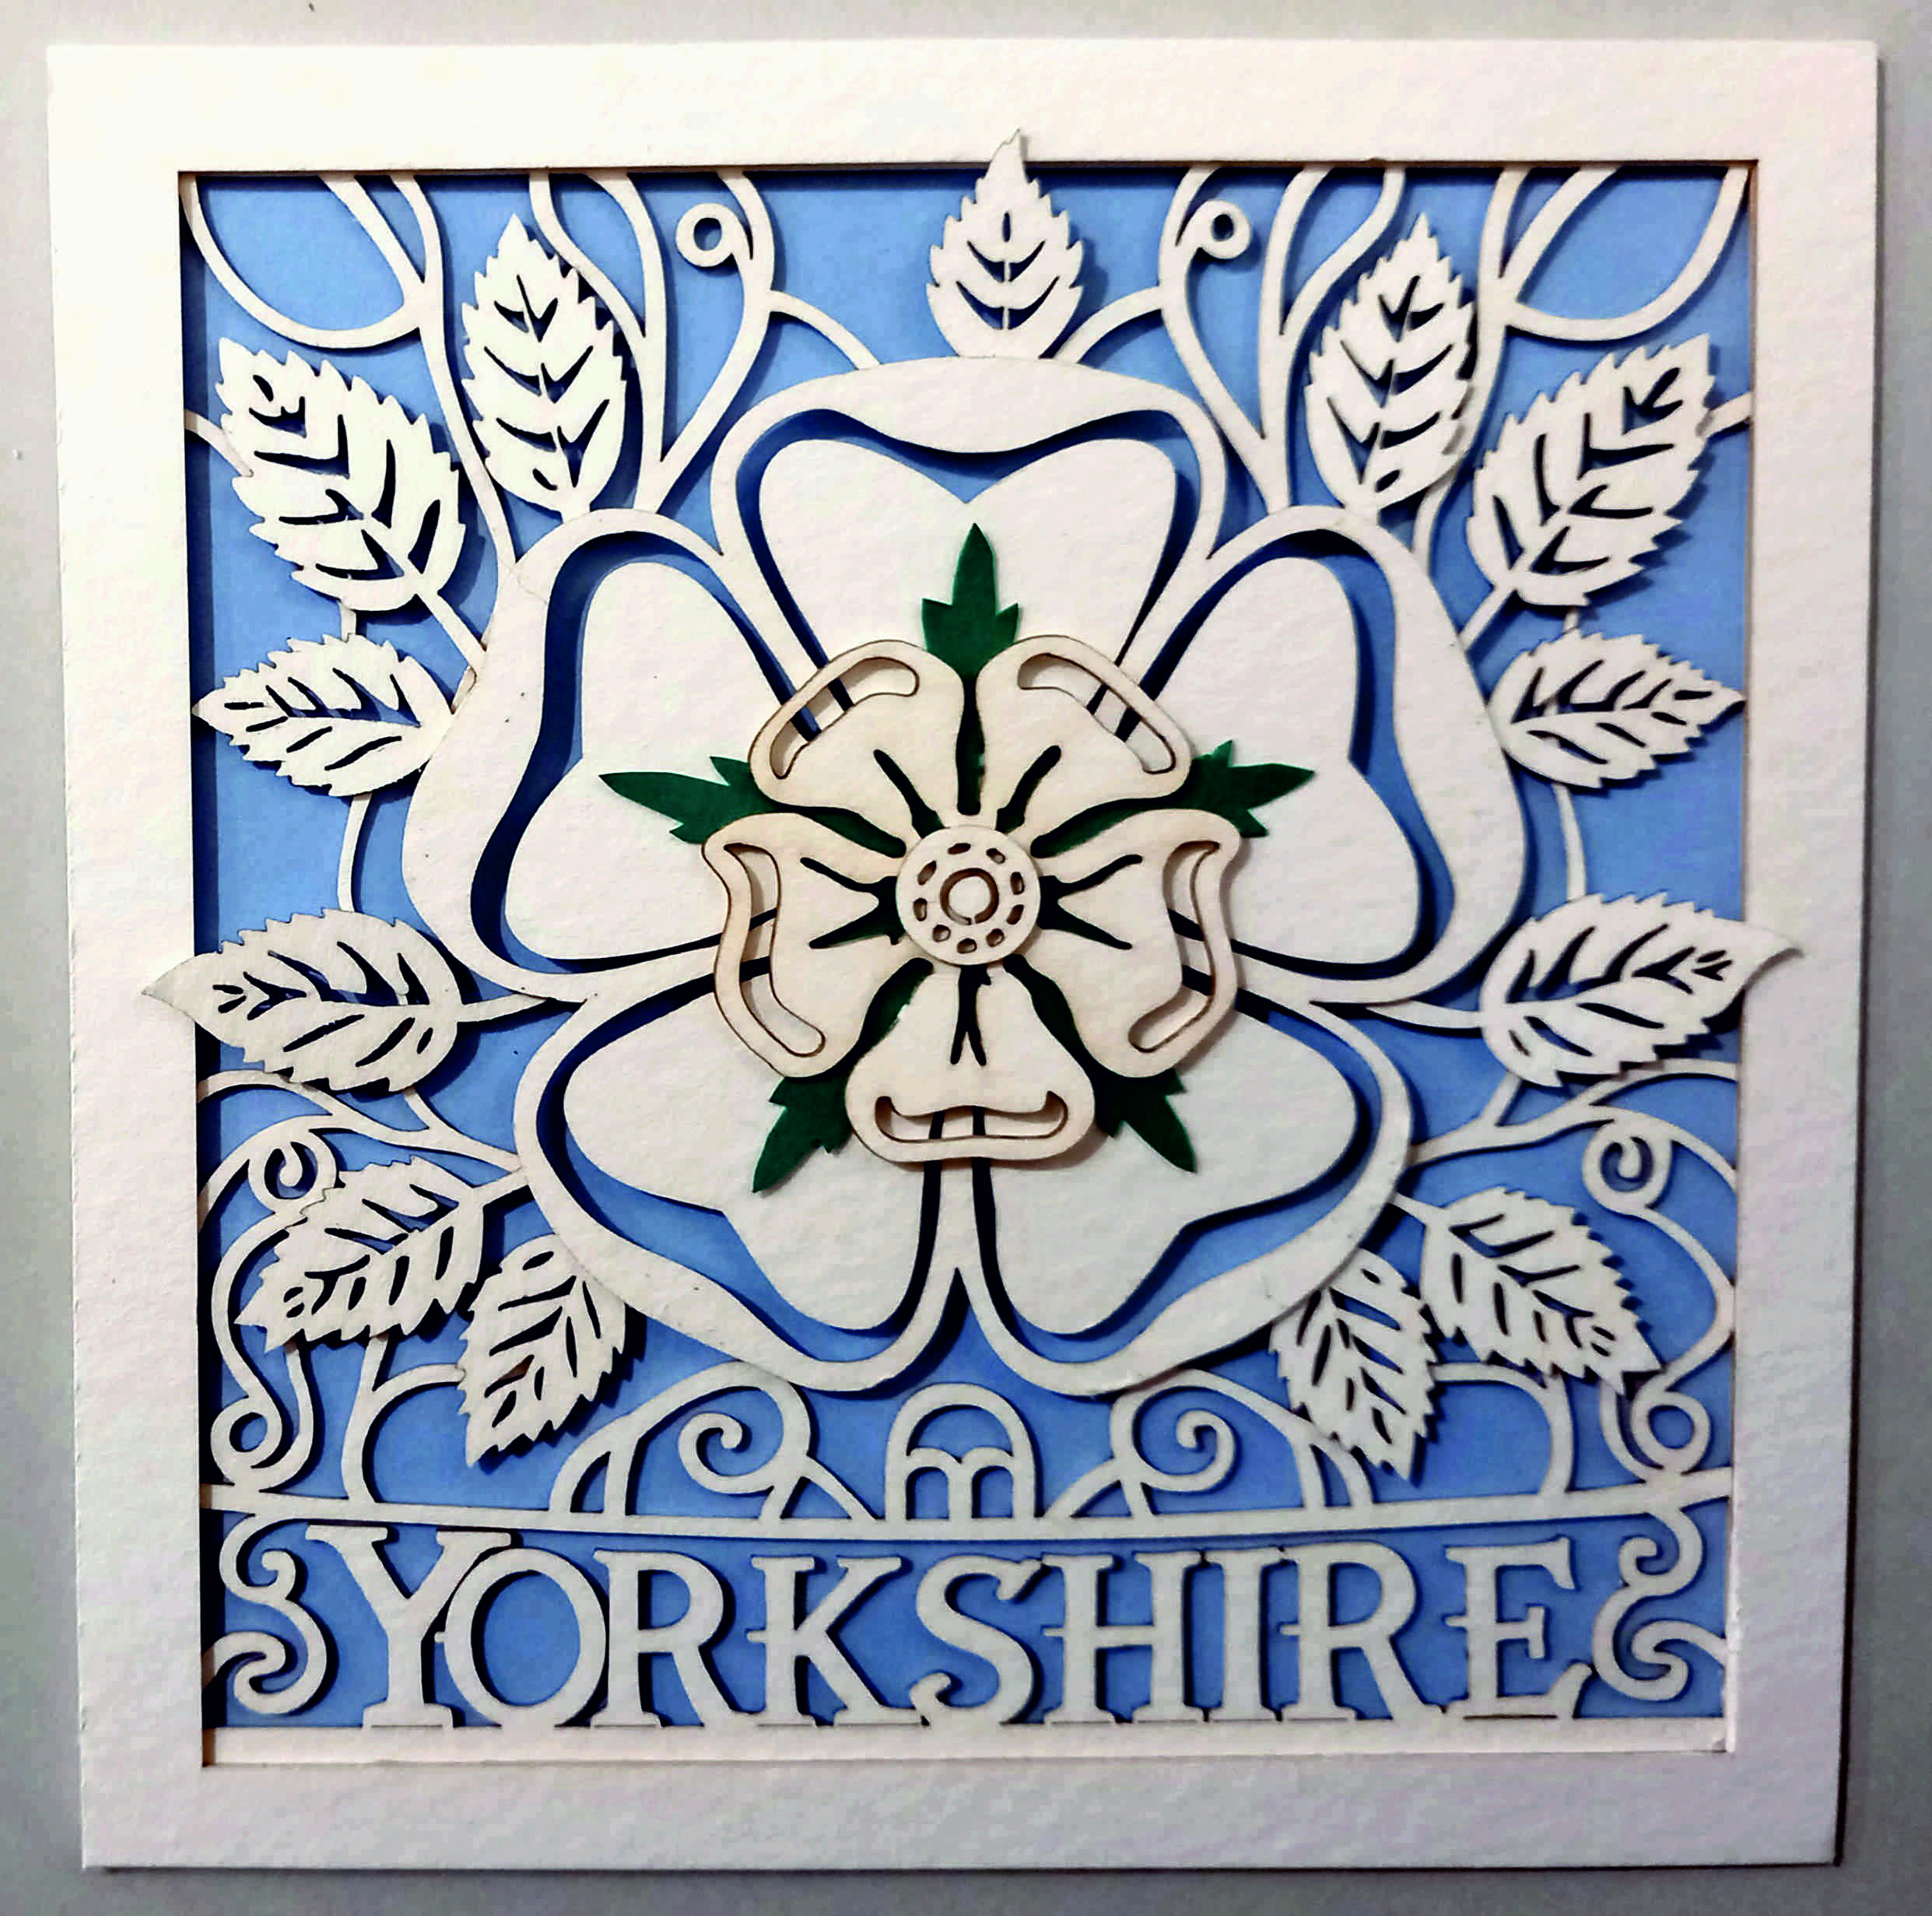
As mentioned previously, I’ve declared that one of my creative goals for 2024 is to create at least 52 AI assisted/inspired artworks this year, using AI-generated images as a prompt for actual physical creative pieces. My most recent piece is a Yorkshire Rose card.
Using ChatGPT’s DALL-E, I gave it a prompt:
Please try to create a papercut greetings card of a Yorkshire Rose.
This is what it came up with on the first attempt:
As usual, my first reaction was “WOW”. But then my follow-up reaction was the realisation that:
1) these designs wouldn’t be very easy to recreate as physical objects, and
2) they were just white roses, rather than actual Yorkshire roses.
…so I had to try to teach DALL-E what a Yorkshire Rose was:
Thanks – those are lovely but they are just white roses rather than specifically Yorkshire roses. The Yorkshire rose is a traditional emblem of Yorkshire in the UK. It is usually shown as having 5 white inner petals and 5 white outer petals – usually with leaves in between the 5 outer petals. It is similar to a Tudor rose, but with all-white petals instead of some petals being red.
Here are the results:
Now we were getting somewhere! For some reason I wanted to create a card that actually said “Yorkshire” on it. So I asked DALL-E to include “Yorkshire” under the rose emblem. This fifth attempt was OK, but again would have been difficult to directly create as a physical card…
…but the sixth attempt was excellent (with – of course – the exception being that DALL-E mis-spelled the only word I’d asked it to include):
Bingo! I instantly loved this design, but there was still a lot of work to do before I could cut it out:
Obviously I needed to correct the spelling.
Some areas wouldn’t work as papercuts because they weren’t attached to any other parts of the card, so I needed to adapt them.
Because of the shadows in the image, I would need to create the image as several layers.
Creating the physical design
This time I opened the Linearity Curve image software, and drew lines around the elements of the design so I could create an SVG file to cut with my laser cutter. I cut it with the laser because I thought I might not be accurate enough if I did it by hand.
Here is the original image on the left, with my physical version of the card on the right:
How well did DALL-E follow my prompts?
As mentioned above, the AI image generator initially didn’t know what a Yorkshire Rose was. However, once I’d explained the concept it did an amazing job… although then it let itself down again by mis-spelling a specific word. The papercut element was great, though. So on the whole I’ll give DALL-E 8/10.
How close is the physical version to the original AI design?
I’m going to give myself 83%. The differences are:
I changed “YORKSHHIRE” to “YORKSHIRE”
I had to link some of the ‘orphaned’ design elements to other parts of the design so that they wouldn’t fall out when I cut them.
I couldn’t get the shadows/lighting the same as in the original image. (Some of the shadows seem difficult/impossible to achieve in the physical version, so I didn’t make too much of an effort trying to get them exactly right.)
To get the right-looking thickness of paper I had to use watercolour card rather than paper, but that’s got a bit more of a creamy colour than the bright paper of the original image.
The laser made brown marks on the edges of the card, so again I haven’t been able to match the brightness of the original image.
Elements where I just left the AI design and didn’t make any changes:
The shapes of the leaves and the rose.
The shapes of the individual letters.
Lessons learned
When making a layered papercut, even if the pieces have already been cut out by laser it can still take a long time to position the pieces correctly so they can be glued into place.
(Solution to point (1) above:) If it’s tricky to position the layers of designs on top of each other, etch the positions onto the backs of the other paper pieces. For example, I etched the outline of the leafy piece onto the back of the large rose piece. This made it much quicker to accurately glue the leaves into place.
Things I still need to learn or improve
Is there a quicker way to automatically (but accurately) convert the JPG image into SVG shapes? I tried to use Curve’s ‘Autotrace’ function, but it wasn’t very accurate so I decided to draw around most of the shapes by hand (using an Apple pencil).
If I get chance later, I might try to match the shadows more accurately, and maybe also try to cut from a thinner, whiter paper or card.
Homework:
Create a specific Barnsley version of the card/artwork.
Create a version with no text.
Try to cut from thinner, whiter paper/card.
Thanks for reading this post. If you’ve got any suggestions of prompts or projects – or if you’ve been experimenting yourself with AI-assisted images – I’d love to hear about them. You can either comment below or send me a message via the Contact form.
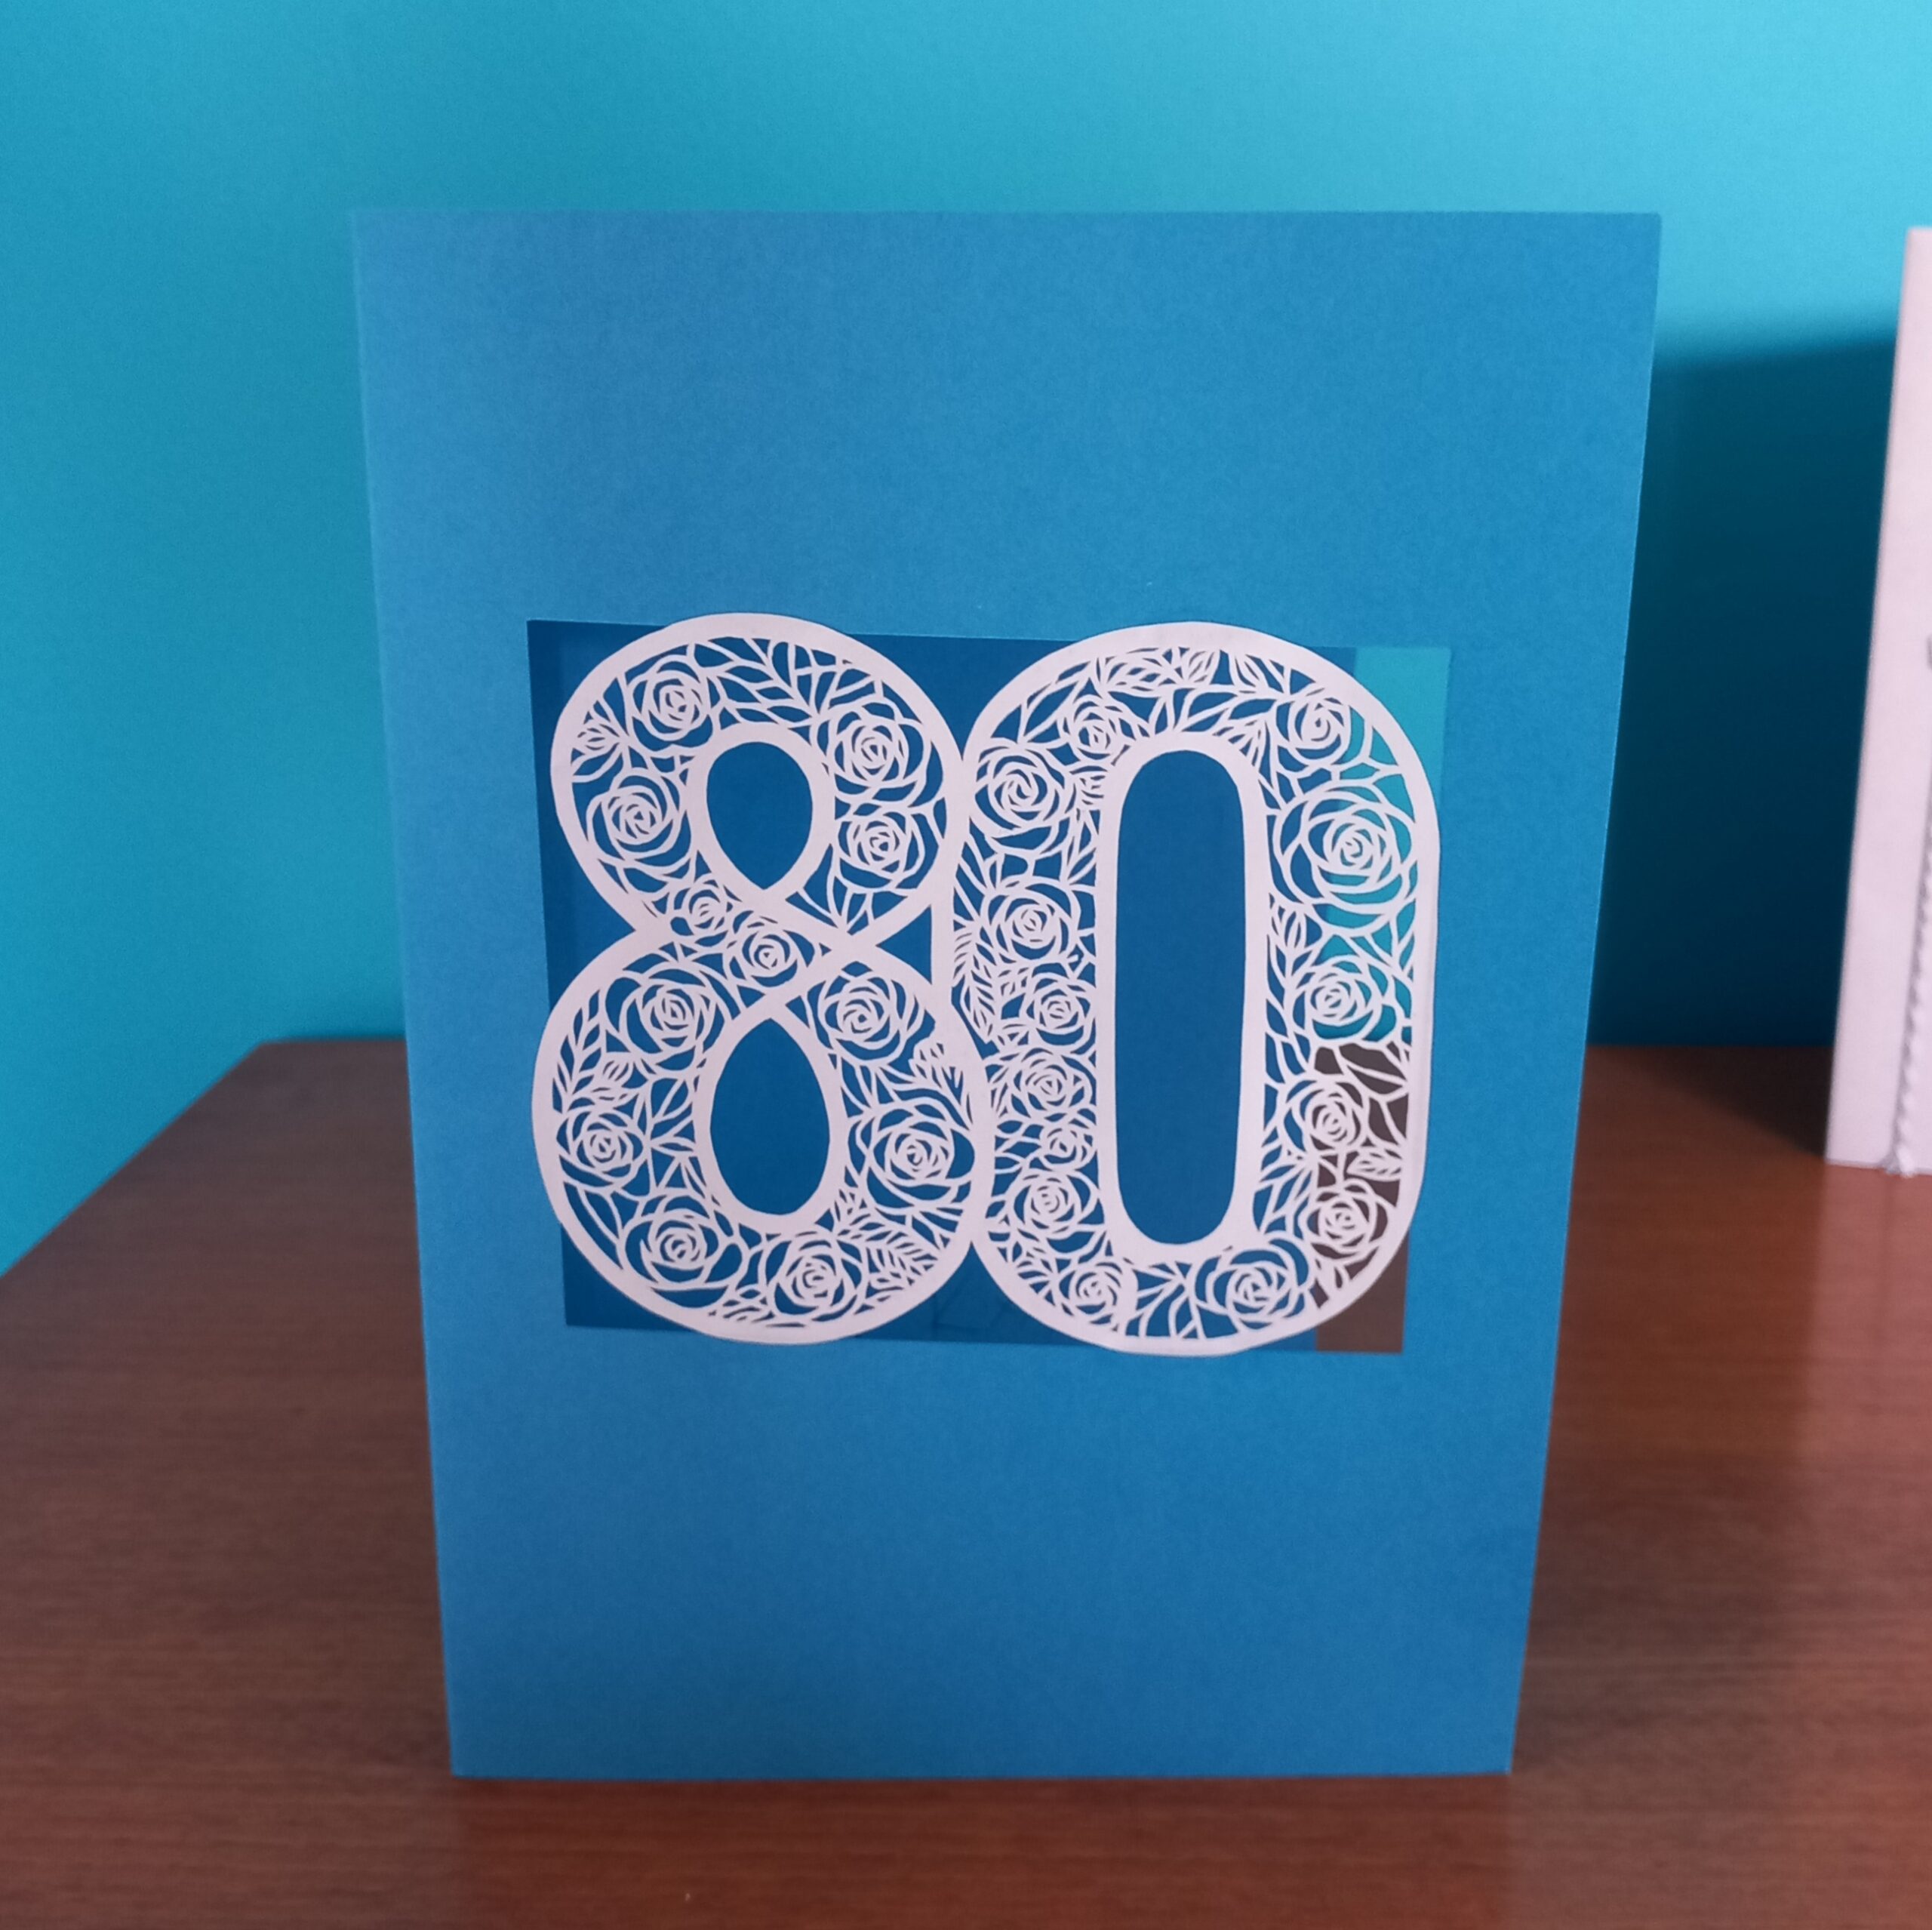
Continuing with my project “An AI Made Me Do It“, I’ve continued to put AI to practical uses by creating physical artworks from AI-generated images. This time I used Kittl to create an 80th birthday card for my mum.
I wanted to do a papercut artwork for the front of her card, but wasn’t sure if the AI would know what a papercutting design should look like, so I tried suggesting an adult colouring page design:
Prompt: “Adult colouring page of a number ’80’. The numerals should be filled with doodles of simple white roses.”
With Kittl you can choose from a set of styles, so I selected “anime vector”, and this was its first attempt:
I thought this was great, but wondered if the AI could keep the floral elements inside the boundaries of the actual numbers. So I used exactly the same prompt again (but not the anime vector style), to see if the design would evolve or if I needed to tweak the instructions. However, see if you can spot the problem with the next few designs…
Artificial “Intelligence”?
They were no good for an 80th birthday card! This is another example of AIs being too “creative” with text. It’s a shame because they were lovely designs – but obviously they were impossible to use because they said “88” instead of “80”.
For a while I tried to generate just the “0” shape by itself, in case I could match any of the designs with the previous 8s, to get the whole figure “80”:
…but none of them seemed to match exactly, so I went back to trying “80” again, with this prompt:
“Papercutting design of a number ’80’, where the 8 and 0 are filled with doodles of simple white roses.”
This time Kittl nailed it first time. (I’d forgotten to select the Anime vector style, but it still did an amazing job):
Cutting it out
I definitely felt I could cut that out by hand. So I printed it (on normal printer paper) and then over the space of three evenings I used an X-Acto knife/scalpel to cut the design. This is the result:
Here is Kittl’s original design on the left, with my papercut on the right.
All the years of doing my “922 Decorative Vector Ornaments” project must have paid off! Because technically speaking, this is one of the best papercuts I’ve done. There were very few errors, and the cuts were clean and sharp. I’ve always loved doing papercuts and I’m a member of GAP (Guild of American Papercutters (- there isn’t a guild of British papercutters)) and this was a great excuse to use my cutting skills.
How well did Kittl follow my prompt?
Right from the start it came up with some great rose designs. I think it helped that I started with the Anime vector style, because by definition this needs to use clear lines and shapes, rather than gradients of colours.
As usual though, there was a point where the AI got too creative. This time it kept giving me the number 88 instead of the number 80. (I am begining to think that the “I” bit of “AI” does not mean “intelligent”.)
After I had a break then went back to a similar prompt, Kittl came up with a design that I felt was immediately usable. It is really rare for me to see an AI-generated design that feels 100% right, but this one not only followed the prompt but also looked like the design I had in my imagination.
How similar is my end physical product, compared with the original AI-generated design?
I reckon it’s about 95% the same (if you ignore the fact that I put it on blue card instead of beige). The camera angle of the finished card makes it look a little bit distorted, but the papercut is the same size and shape as the original image (I was cutting it out directly from a printout of the design). I’ve suggested the final 5% difference because Kittl put shadows behind the numbers, as if the 8 was hovering a couple of millimetres above the 0. But because I just cut it as a single piece and then stuck it onto a windowed card, mine didn’t have the shadow effect.
Lessons learned
Kittl seems to be naturally great at creating colouring pages and/or papercutting designs.
Currently (April 2024) AI image generators still have a problem with producing the exact text from a prompt.
Things I still need to learn or improve
One of these days I should really come up with a better overall design for the cards that I put my papercut artworks onto (or into, in the case of pop-ups). On the other hand though, I suppose having such a simple overall design means that viewers have to focus on the papercutting itself.
Homework:
Develop this design as a lasercutting file.
Try to mount the laser-cut artwork on a piece of beige card, to see if I can get it to look even more like the original design.
Create more papercut number cards using Kittl.
See if any of the other AI image generators can produce similar (or better) results for papercut cards.
Summary
For me this felt like a great practical use of an AI text-to-image generator. I needed an original design for a special occasion, and in minutes the AI – Kittl, in this case – created a design that would have taken me maybe a few hours to produce myself. As a result, ‘all’ I had to do was the cutting of the artwork (which of course took a few hours, but it was for a very special occasion so I wanted to put a lot of effort into it).
Thanks for reading this post. If you’ve got any suggestions of prompts or projects – or if you’ve been experimenting yourself with AI-generated images – I’d love to hear about them. You can either comment below or send me a message via the Contact form.
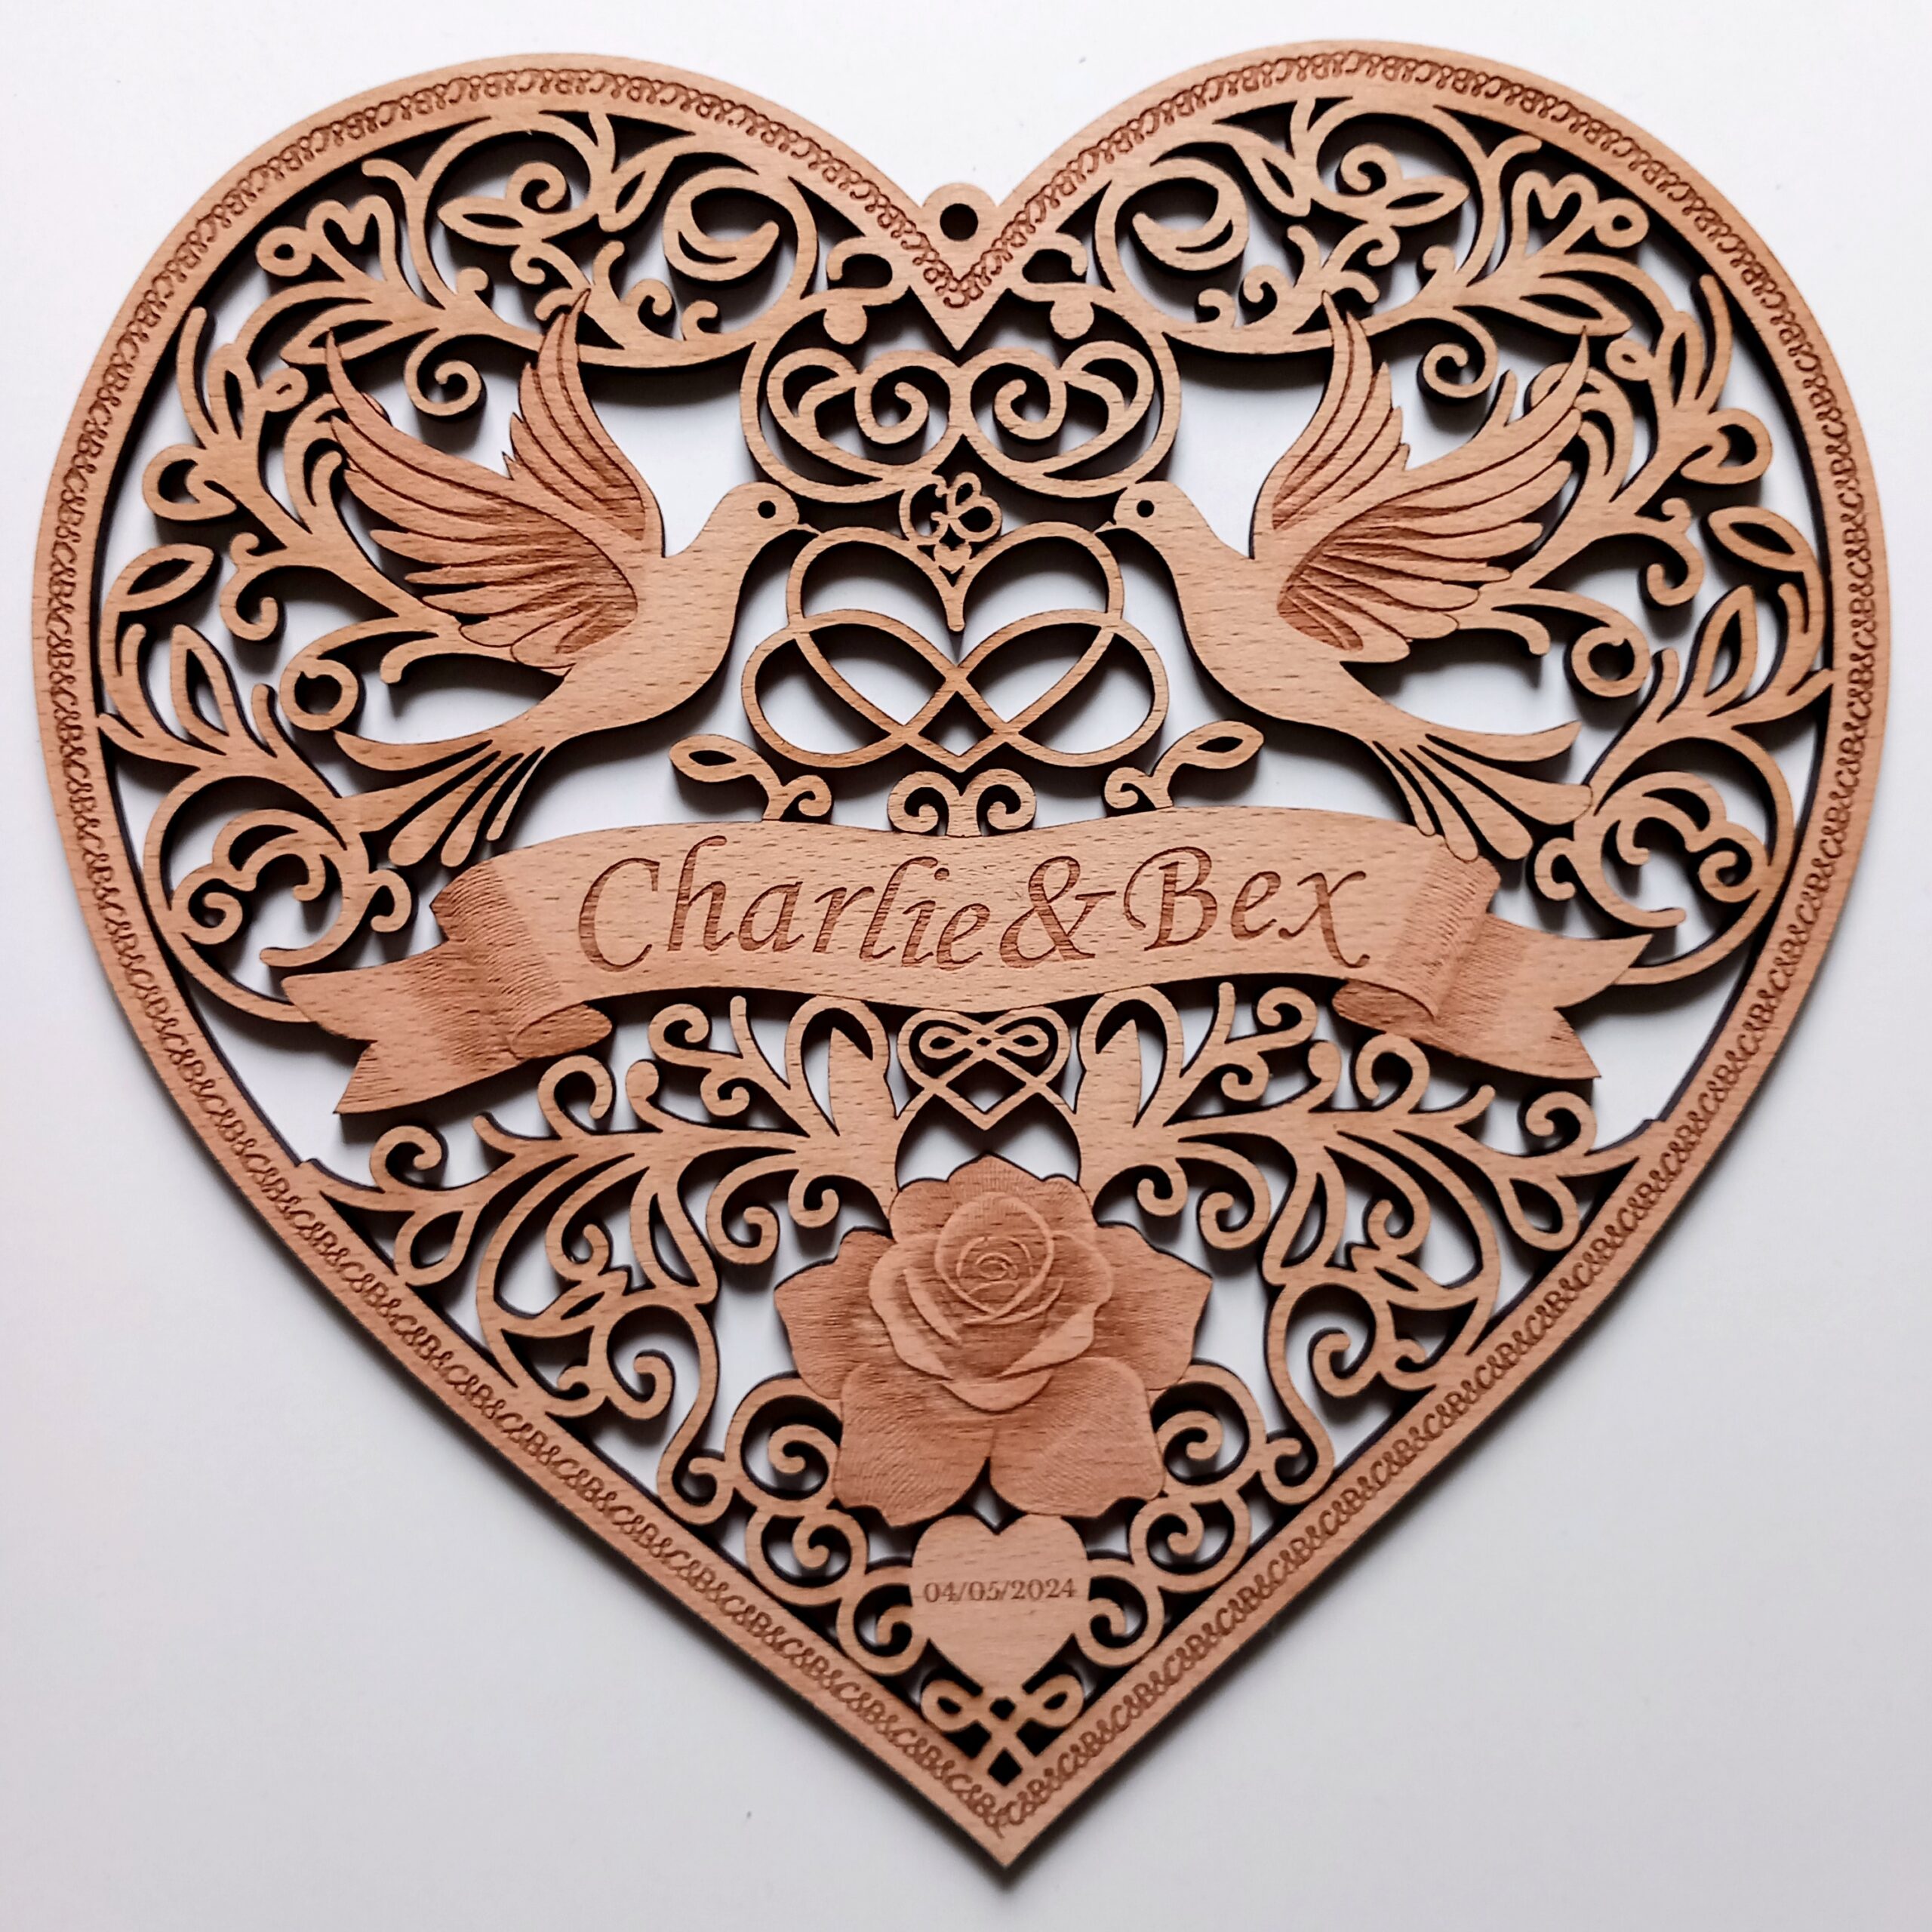
As mentioned earlier, one of my creative goals for 2024 is to create at least 52 AI assisted/inspired artworks this year, (using AI-generated images as a prompt for actual physical creative pieces). My latest piece was for a commissioned artwork, of a wedding woodcut. The customer had seen my previous wedding heart papercut, but wanted a wooden heart instead of paper.
I suppose I could have just used the same design as the papercut…
Personalised papercutting
…but this seemed like a great opportunity to ask an AI to help me with a new design. This time I used ChatGPT / DALL-E. Here is the first prompt (I’m still in the habit of using “please” and “thank you” with the AI):
“please could you create a design for a heart-shaped piece of wooden wall art for a wedding? The wooden object should feature the names “Charlie & Bex.”
and this was the result:
Wow.
It was a lovely design, but it didn’t really scream ‘wedding’ at me, so I followed up with “Please could you try the same design, but with the design cut out using a fretsaw or scrollsaw (instead of carved into the wood)?” This is what came out next:
Wow again. For a start I was impressed that Dall-E actually knew what I meant by fretsaw or scrollsaw! But it still needed to be a bit more wedding-y (and what the heck was that “CERDDING” about?!)
This is why I really like the collaborative aspect of ChatGPT’s Dall-E. Having the interaction as a conversation allows the user to tweak the design in an iterative way, just changing one or two parts of the prompt at a time, instead of having to type out a giant long prompt with all of the required elements of the design. I felt that the second design still looked a bit too flowery, so I asked it to replace the large flowers with doves. Here is the result:
Fibber!
Again, that was a really nice design, but one of the things I’d liked about the previous versions was that the design had included a small blank heart near the bottom, which I thought would be a great place to write the date of the actual wedding. So I asked Dall-E to insert a small blank heart near the bottom.
Dall-E replied “Here’s the updated design with a small blank heart near the bottom, providing space for you to add text later.“
– but that was a big fat fib! Unfortunately, although ChatGPT / Dall-E is fantastic in a lot of ways, it often falsely claims that it has done what I asked. I actually really liked that design, but because it wasn’t 100% perfect I persevered and asked it to include roses or passion flowers. Again, it came up with a lovely design…
…but again it wasn’t quite right. I loved the birds and the overall look and the little banner with the names in, but there were a couple of problems:
There still wasn’t a blank heart for me to add a date later
Some of the lines were getting a bit too fine to cut out
I didn’t really like the big flower in the middle
Getting somewhere…
So I tried again, with this prompt: “Create a design for a heart-shaped piece of wooden wall art for a wedding, which looks like it has been cut out by a fretsaw or scrollsaw. The wooden object should feature: the names “Charlie & Bex”, two doves, a simplified passion flower, and a small heart-shaped area left blank for text.“
This time the GPT had done exactly what I asked…except that I’d changed my mind about putting in a lotus flower.
“Nice! Can you try another design like the one on the left, but with a rose or calla lily instead of the lotus flower?”
Frustration
This is where I started to get frustrated. I’d thought that the next image was going to be perfect, but it was getting worse. It had inserted a passion flower instead of a rose, had mis-spelled Charlie, and changed the doves into seagulls. Sigh. At the moment (April 2024) there always seems to be a point where the GPT turns into a complete arse, and deliberately does stuff to annoy me. We went through about twenty more iterations after that, where it was creating very nice designs, but they weren’t actually what I’d asked for. I swear it was deliberately ignoring my instructions.
After several days of fighting with DALL-E on and off, it finally created a design that I thought could work as a lasercut piece:
This fit the brief in most ways:
Heart shape wedding woodcut
Rose
Two doves
Correct names in a banner
Infinity symbol
Small blank heart (although it was too small to incorporate any text)
Looked like it had been (or could be) cut with a fretsaw or scrollsaw
Final Design
I made a few tweaks to the final design, by:
Making sure all of the elements connected to at least one other element, so no pieces dropped out.
Simplifying and/or thickening the swirling lines of the designs, to make the final piece less fragile.
Swapping the doves for two others from an earlier version.
Converting the squiggle above the heart-and-infinity-sign into a “CB” monogram.
Changing the typeface of the names.
Enlarging the blank heart so I could add text to it.
Changing the decorative edge to a repeating “C&B” design.
Adding a hanging loop.
Altering the squiggles above the rose so that they formed another heart.
Here they are next to each other:
I do love the original, but it just wasn’t practical to cut out exactly as it was (e.g. with some lines being too thin, and some elements not connected to the rest of the design). I might try etching it rather than cutting it, just so I have a version that’s more faithful to the original, but on the whole I’m really pleased with the way the wedding woodcut turned out.
The only real improvement that I feel I made is that I joined the top parts of the heart (above the infinity symbol). Most of the other changes were just compromises, to join up the disconnected or thin sections.
Lessons learned
ChatGPT / DALL-E is awesome. I can’t believe how aesthetically pleasing most of those designs are.
From a technical point of view, I’ve learned how to create ‘masked’ sections of images via the Linearity Curve app (i.e. sections of the design I can isolate, then copy and paste and/or export into other applications).
Things I still need to learn or improve
Why does it do that thing where it starts ignoring parts of my prompts? I need to try to find out if there’s a way to stop that happening.
Homework:
Try to create a specialist ‘Wedding Woodcut’ GPT, so I can design similar wedding hearts in the future.
Summary:
I felt like this was a really successful project. DALL-E helped me to create a design which combined the look of a traditional woodcut with the modern technology of lasercutting and AI image generation.
Thanks for reading this ‘Wedding Woodcut’ post. If you’ve got any suggestions of prompts or products – or if you’ve been experimenting yourself with AI-generated images – I’d love to hear about them. You can either comment below or send me a message via the Contact form.
I have just been to the 20Books Sevilla conference, and it was just as inspiring as I’d expected. Before I set off, I asked ChatGPT to come up with some ideas for “author merchandise” (because I’m still on my challenge of creating 52 AI-assisted artworks during 2024.) One of the ideas it suggested was “Author merchandise for recipe book authors”, which should include “A recipe book title etched onto a wooden spoon”. So here is my interpretation below. To be honest I’m nor sure this even counts as an artwork, but I thought that authors of recipe books could put their book title on one side…
…and then they could put a QR code for their website on the other side of the spoon:
As it happens, I didn’t actually meet any authors of recipe books at the 20Books conference so I couldn’t show them my spoon-based wares, but that doesn’t really matter because I’m just doing what the AI tells me to do.
I met lots of lovely writers (even though none of them were authors of recipe books), and I also made a drunken promise commitment to another author (which I will explain more about at a later date…)
As mentioned in an earlier blog post , I follow Joanna Penn’s Creative Penn podcast and was inspired by her New Year newsletter where she invited listeners to share their creative and business goals for 2024. Therefore I’ve declared that one of my creative goals for 2024 is to create at least 52 AI assisted/inspired artworks this year, where I will use AI-generated images as a prompt for actual physical creative pieces. As the year progresses, I’ll note down what happens and what my thoughts and feelings are about it. In the meantime, here we go with AI-Assisted Artwork #1: Heart-shaped wooden fridge magnet.
[By the way, my links in this post aren’t affiliate links or sponsored products. They’re just for info.]
I’ve already been experimenting with a few AI text-to-image generators in the last couple of weeks, and so far the overall results range from “Wow!” to “WTF?”. I haven’t yet found a single image that feels absolutely perfect for me to use immediately, however, that actually makes me happy. If computers can generate perfect art at the push of a button, then what’s the point of humans creating art? And indeed, what would be the point of humans viewing that art? As a creative person, these thoughts can all be very confusing and unsettling. However, as with most things in life, there is a sliding scale of what people find acceptable or unacceptable. Through this AI Made Me Do It project I’m going to attempt to find where my own views are along that sliding scale. (And if I can get the technology to work, I’ll also attempt to find out what other people think.)
AI Assisted Artwork #1
The first step was to come up with a text prompt for generating an image that could be somehow rendered as a physical object. I already had a laser-etched design in mind when I created the prompt, but it took several attempts to get an AI to generate an image that I could convert into something usable.
I started out with the Kittl AI engine, and didn’t get very far. The images were pretty cool (I thought the photography-style images in particular were amazing), but I didn’t feel like I could do justice to any of them:
I continued adapting the prompts to see if I could produce something simpler:
…but although I thought the images were fascinating and they might inspire me for future projects, they weren’t what I was hoping for. Not to mention that Kittl seemed to be deliberately ignoring my instruction about books and pens. The designs were a bit too complex for a first attempt at making something. (I was trying not to be too ambitious with my first design, so that I hopefully wouldn’t be too disappointed with the end result.)
Because Kittl wasn’t producing the goods, I switched to using the Adobe Firefly generator. Again it took me a few iterations of not-quite-what-I-was-looking-for images…
…before it finally produced an image I thought I could use for this project.
Prompt used: “heart-shaped wooden fridge magnet decorated with leather books and 3 pens, with a circle in the centre for text“
It’s not 100% accurate in terms of the brief:
there are only two pen-looking things instead of three,
there’s a thing that looks quite like a book, but it’s not particularly leathery and there’s only one of it
there is a blank space in the middle but it’s an oval rather than a circle
However I quite liked the design and I thought it had the right amount of detail in it for me to attempt to turn it into an actual physical object.
I imported it into CorelDraw (the recommended software for my lasercutting machine), and tweaked the colours to make some areas of the image etch more deeply than others. I also added a hairline-width border around the design, to tell the laser machine to cut out the heart shape.
The CorelDraw screenshot below records my experiments with the colours and settings of the image. Each one took at least a couple of minutes to manipulate, which shows that the process certainly wasn’t a question of just clicking a button to churn out a finished piece.
Eventually I found the right balance of settings, and then etched and cut the heart shape from a sheet of laserable birch-veneered MDF. Here is the lasercutting machine in action (speeded up!):
Below is the original image on the left, then the actual physical piece that I etched and cut. I was fairly pleased with the result, although somehow the etched design seems flatter than the original 2D image?!
AI-generated imageActual wooden heart
Of course now that I’ve made the thing, I can think of zero occasions when anyone would actually want a heart-shaped wooden fridge magnet with designs of pens and books etched into it. However, I can think of several examples of when a heart-shaped magnet would be an appropriate gift or keepsake, provided it had a different design etched into it. How about:
A “save the date” keepsake item, etched with the bride and groom’s names and the date of the forthcoming wedding.
Gift for a husband or wife for their fifth (i.e. wooden) anniversary
Family fridge magnet with names and birthdays listed
Reminder of inspirational, thought-provoking, or religious quotes
Things I’ve learned
There is definitely more to creating AI-generated images than just typing in some words and pressing a button. For a start, I constantly had to amend my prompts in order to steer the image closer to what I was hoping for. I went through loads of iterations, and in fact with the Kittl generator I just gave up in frustration because it seemed to be willfully ignoring my instruction to include books and pens in the image. To go from the first attempt to finally receiving an acceptable design took nearly an hour of re-tweaking prompts. Then to go from that image to a suitable format for laser etching took about two more hours. It was very interesting to be part of this human/machine partnership, because we were constantly providing feedback to each other and I’m sure that neither of us could have produced that final design by ourselves.
Technical lessons. I’ll skip the details because I’m sure they’ll be boring and irrelevant to a lot of people, but basically I’ve discovered several useful skills that I should be able to build on when I’m creating future pieces. E.g. I’ve learned the pros and cons of converting the original image to greyscale bitmap image versus converting it to a vector graphic. (See? Told you it was boring).
Things I still need to learn or improve
More technical lessons. There are a lot of technical factors that I could improve (mainly to do with the depth and quality of the etching), but considering this is the first time I’ve converted an AI-generated design into a fridge magnet, I won’t beat myself up over it. For now I’m fairly pleased with the result, and I can always try to improve on the object later after I’ve actually gained those technical skills.
How to streamline the process and waste less time. This is related to the first point, but I do feel like I wasted a lot of time trying to get Kittl to understand what I was trying to achieve (e.g. that I wanted the wooden fridge magnet to have drawings of pens and books etched onto it). So I need to try to find out more about how to give better prompts to AI image generators, to ensure a more accurate result. Also, once I get a handle on the technical aspects I might be able to create a checklist of steps to follow, instead of blundering around experimenting with colour/contrast/brightness settings, etc.
Keep better records! Even though I’ve only been using these AI image generators for a couple of weeks, I’m already looking back at some of my first experiments and thinking “Ooh, that might work for another project one day. I wonder what prompt and style I used for that image?”, but unfortunately I haven’t noted them all down. I need to find a quick and efficient way to store and retrieve that information. Firefly does keep the prompt details along with the images if I save them to a gallery, but it doesn’t seem to include the styles or effects that were applied. For example there is a lot of difference between the two sets of images below. They both used the prompt “black cat with blue eyes and bat wings”, but the upper set used styles like “anime”, “flat design”, and “line drawing”, whereas the lower set used styles like “photo”, “hyper realistic” and “fantasy”:
(I was going to criticise the number of tails that a couple of those cats have, but then I realised I’d asked for pictures of cats with wings, so I can’t complain that they’re not realistic.)
Hopefully my skills will improve over this coming year as I continue to experiment with using AI-generated images to inspire physical artworks, but for now I’m pleased to have got off to a successful start. The final design might not be something that customers would interested in buying, but at least I’ve proved to myself that I can produce an AI-generated image that can be etched onto a wooden fridge magnet.
Homework:
Try to find tutorials or tips about Firefly- and Kittl-specific prompts.
Try to create a “Save the date” fridge magnet.
Try to create a heart fridge magnet for a fifth (wooden) anniversary
See if I can find a way to store and organise screenshots of my AI experiments without them taking up too much digital storage space.
Use a normal AI text-based generator to see if I can get it to suggest some further products.
Thanks for reading this post. If you’ve got any suggestions of prompts or products – or if you’ve been experimenting yourself with AI-generated images – I’d love to hear about them. You can either comment below or send me a message via the Contact form.
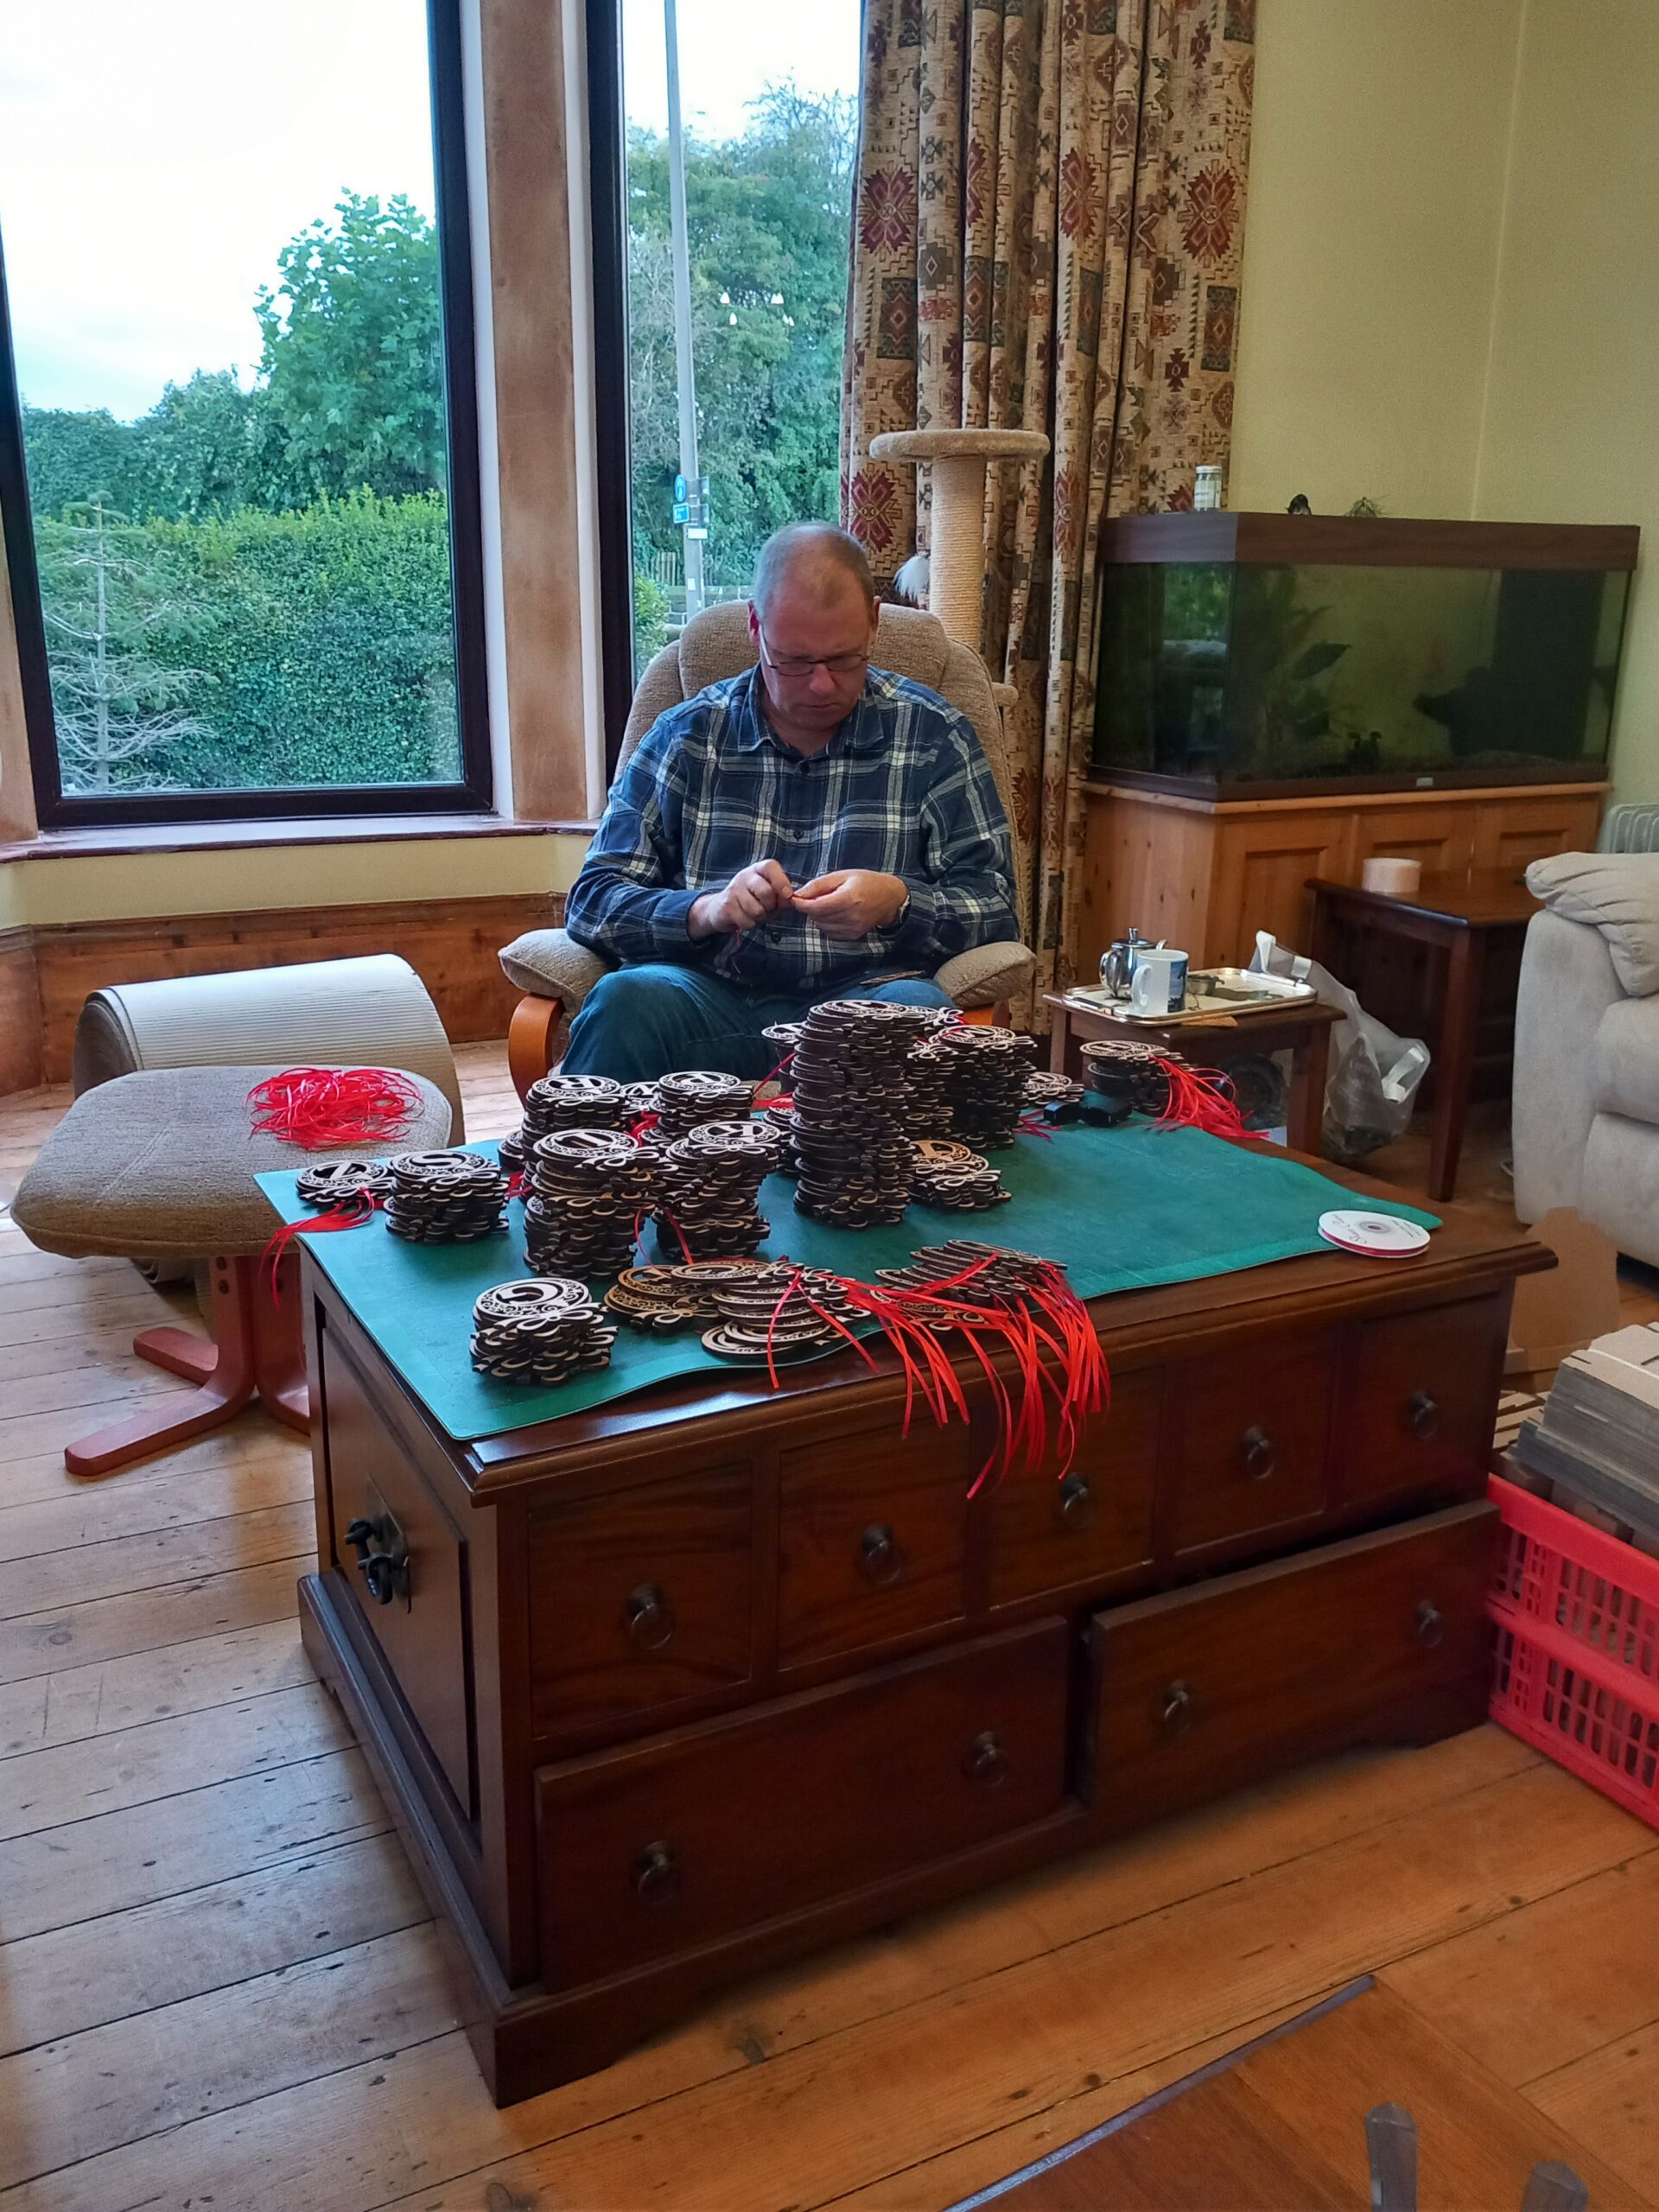
Having a craft business means that the “Christmas rush” starts early. Normally I begin sending boxes of my lasercut gifts off to Amazon in September, but this year my existing lasercutters both broke, so I had to order a new one – but it couldn’t be delivered until mid-October. Since then I’ve been frantically trying to catch up with my cutting schedule, making alphabet baubles:
This is what I look like for most of the day at the moment:
However there’s so much to do that it’s not just my Laser Lair that gets full of baubles. The rest of the house becomes part of my little factory…and the rest of my family become my little Christmas factory elves. Here is one of them putting ribbons in the baubles:
LaserSister factory elf #1
…and here are two more making up boxes and putting the labels on them:
LaserSister Christmas factory elves #2&3
Hopefully we’ll get all of them sent off to Amazon in time for the Christmas rush!
Click here to see if I managed to get them to the warehouse on time, or if they are sold out. (The link shoud go to my Amazon Handmade page, so you can get a live view of the baubles.)