As mentioned in this post, I have recently taken up marquetry and I’m really enjoying it. I am now always on the lookout for new projects. This week I’ve combined marquetry with another hobby (fishkeeping), and have cut out a goldfish design. Because I’m still at the learning phase I’m cutting everything by hand, but at some point I’ll probably start to combine hand-cutting with laser-cutting.
This is what I’ve managed so far:

Stages of making the marquetry goldfish
First I chose a piece of veneer. It’s impossible to tell from this photo, but the piece had been dyed to a light greeny-blue shade. Once I’d found the nice wood I traced a basic fish design onto it.

Using the ‘window method‘ of cutting, I started with the dorsal fin. I deliberately made bottom end of the cut longer than it needed to be, so that I could use the inserted fin as part of the window of a later section. So it didn’t matter that there was a gap at the bottom left of the fin.

Then basically I kept repeating the steps of:
- cutting a window shape out of the greeny-blue veneer (e.g. fins, body, tail sections)
- viewing the orange-coloured veneer through the window so I could find a woodgrain that looked as fishy as possible
- using that window as a guide for cutting the right size of orange-colour veneer to insert into the window
- glueing (?gluing? Both spellings look wrong) the freshly-cut orange veneer piece into the window.

Wonderful woodgrain
This is one of the things I like most about marquetry; the way the woodgrain pattern makes each piece absolutely unique. Here the grain not only has lines in it but wavy lines, so the goldfish tail looks even more realistic. And of course, the lines in the greeny-blue wood look nice and watery.

More fins being added:

Pectoral fins cut and inserted:

Bottom section of fish tail has been cut and inserted. Again I was pleased to find some grain that had a bit of a wave to it.

I thought I’d gone horribly wrong here, because it looked like I’d added a clown’s nose to the fish:

…but when the body was cut and inserted, I was very relieved because the nostril thing didn’t stand out much after all. (Note: at this stage the inserted body-section replaced the bottom of the dorsal fin, so removed the previous gap.)

I was also quite chuffed with the way that the woodgrain looked a bit like fish scales:

Fin-ishing touches
Nearly finished, with the mouth and gill inserted, and a window cut out for the eye. The single mouth-and-gill shape was a really difficult shape to cut out. I could have made things easier by cutting it as two pieces instead of one, but fortunately nothing broke while I was doing it.

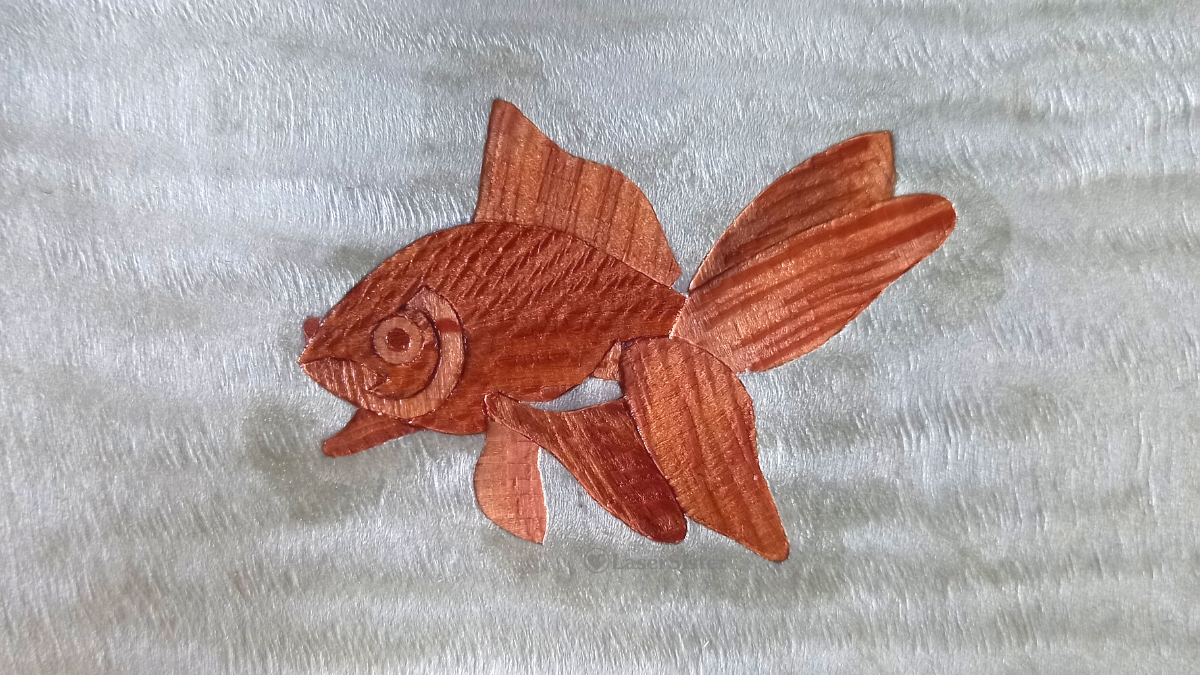
I forgot to take a picture of how I cut the eye, because it all got a bit tricky at this stage. Here is the finished marquetry goldfish:

The outer section of the eye is just under 5mm in diameter so was fiddly enough to cut by itself, but then I had to cut a 2-ish mm hole out of the middle of it so that I could insert the smaller, darker circle. No finesse at all was involved; I had to just hack away with my scalpel until I’d managed to carve out a hole from the wood.