Posted on Leave a comment

Hand-Cut or Laser-Cut? That is the Question!

valentine heart and doves papercut comparing hand-cut and laser-cut versions (hand-cut closeup)

Today I put a short video on TikTok and YouTube (and a couple of other social media sites) comparing two papercuts. I asked, “Hand-Cut or Laser-Cut”? This is the design from a previous post, where I got ChatGPT/DALL-E to help me design a Valentine heart. I then cut it two different ways; by hand and by laser.

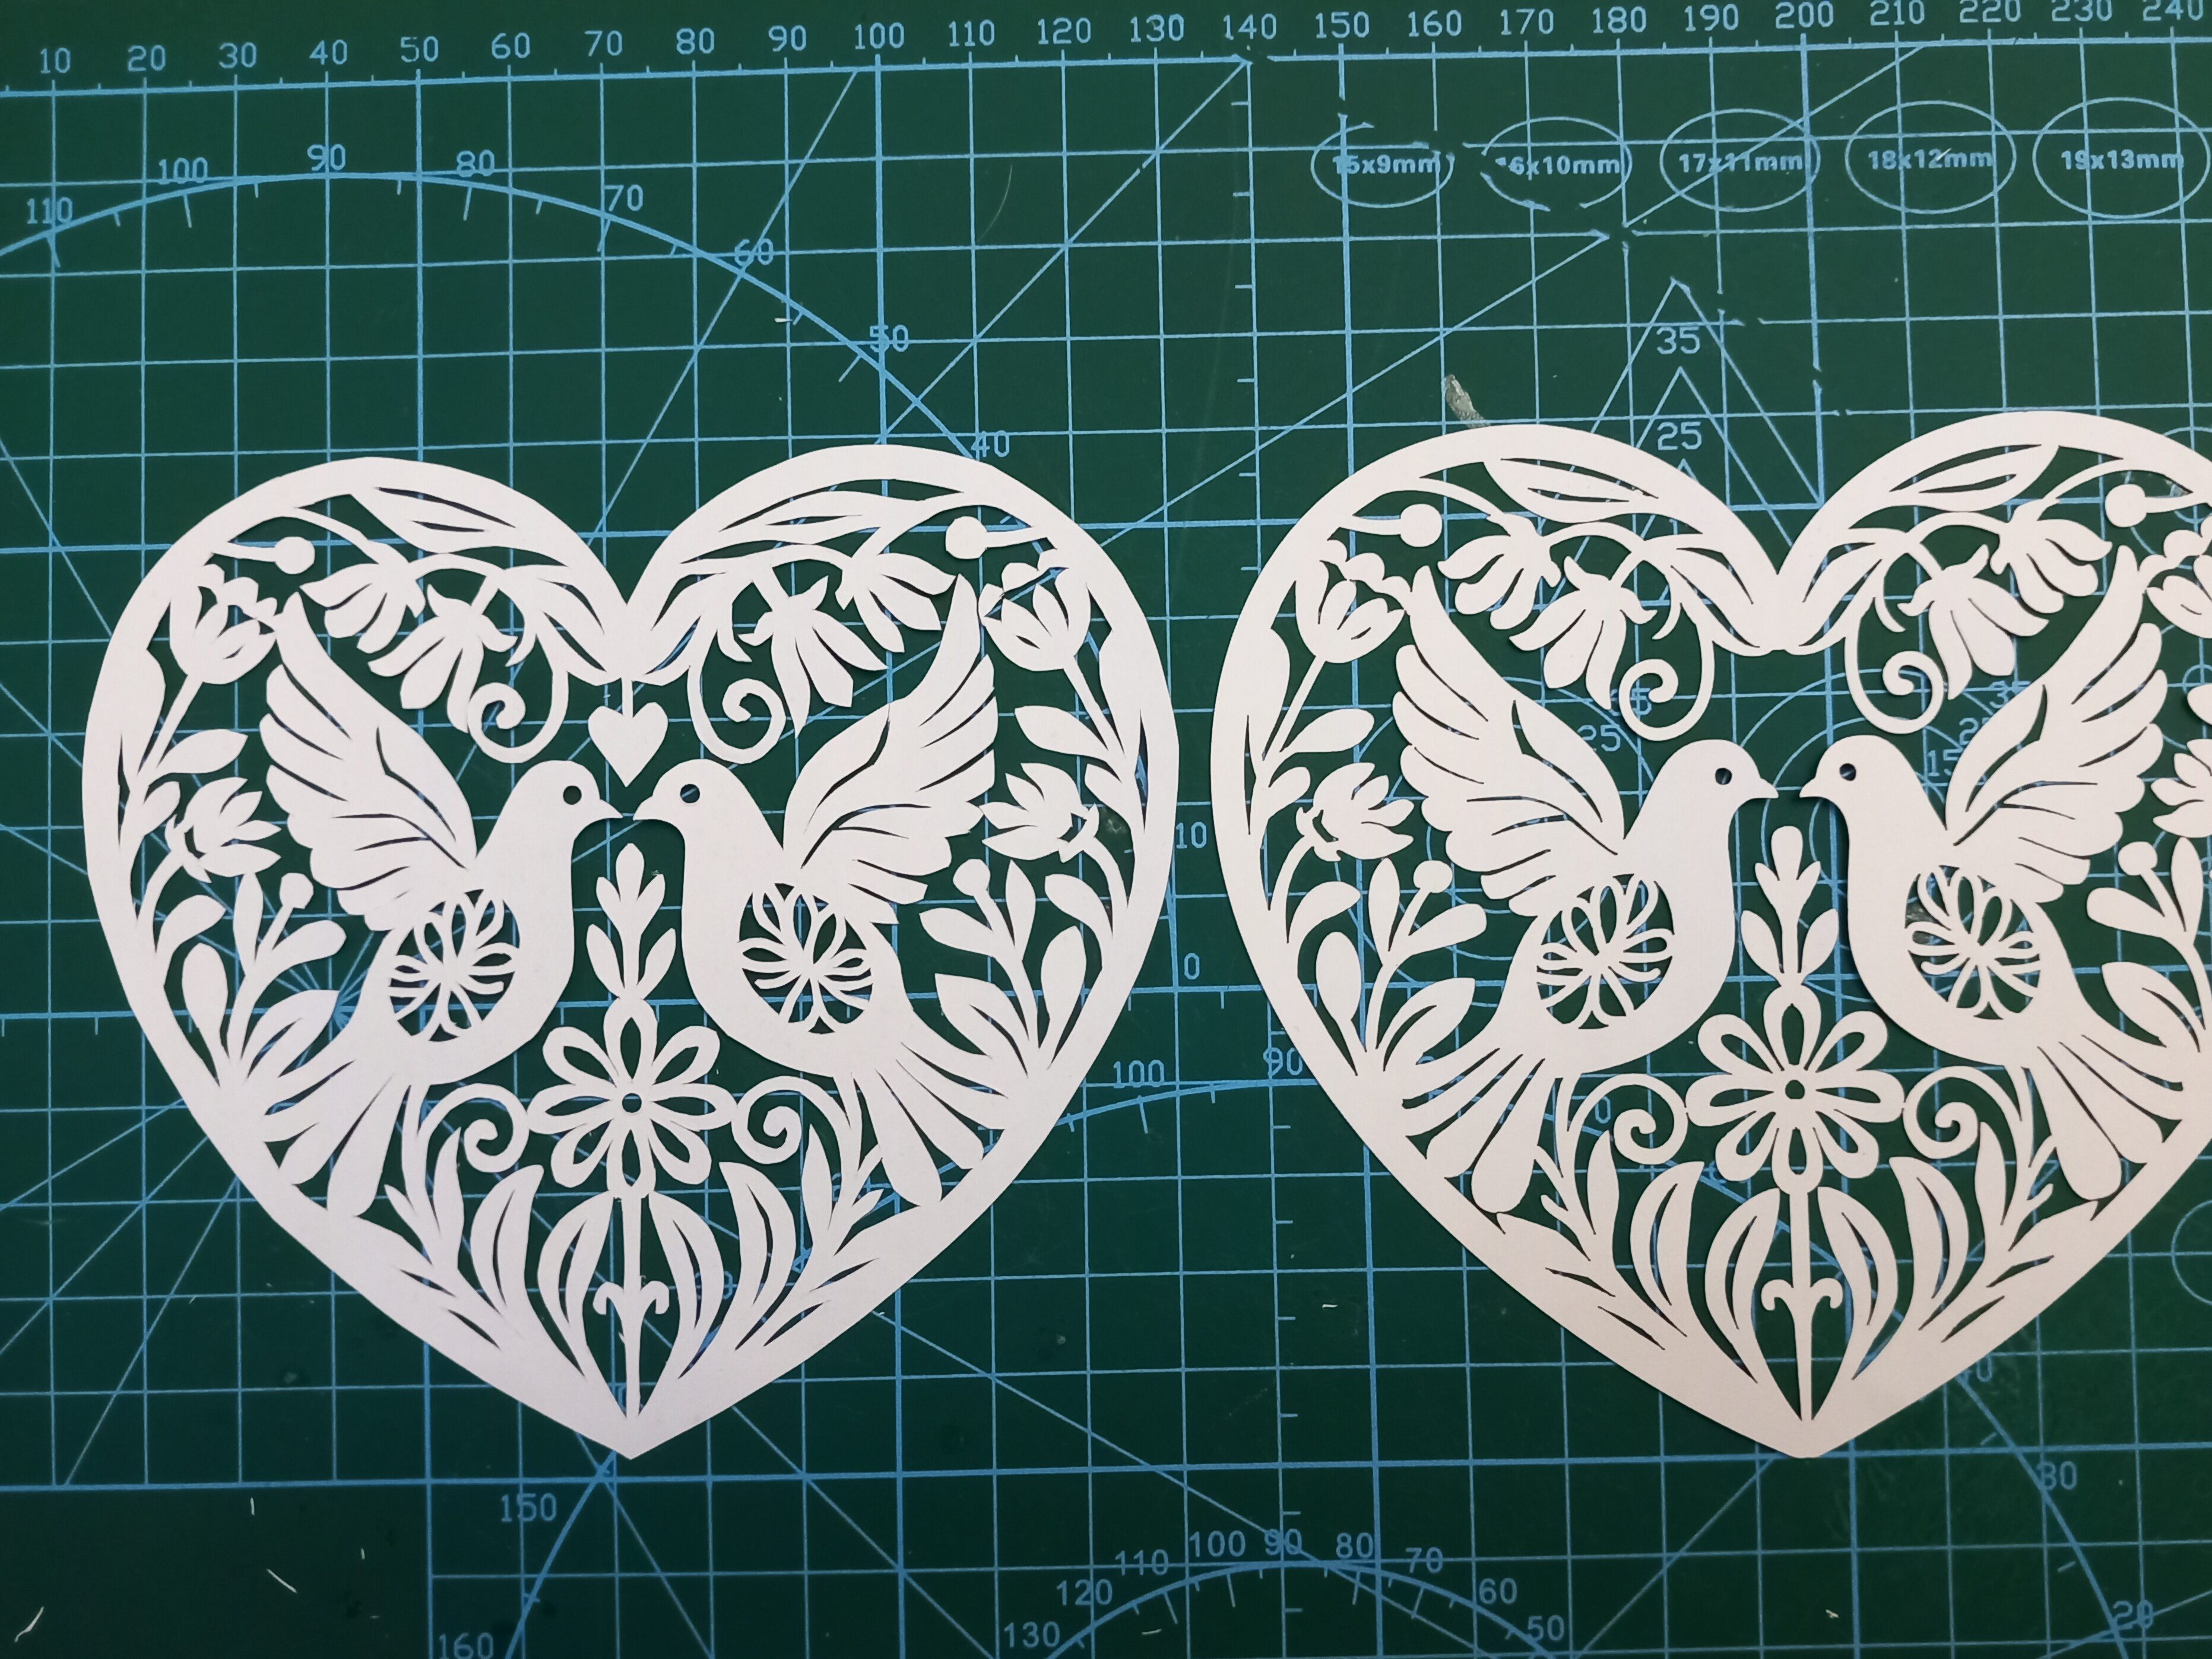
Here is a closer look at the two pieces. Can you tell which is which?:

valentine heart and doves papercut comparing hand-cut and laser-cut versions

(Before anyone mentions it – I realise I accidentally cut off the little heart above the doves’ heads in version 2. Oops!)

So…the one on the left is the hand-cut version:

valentine heart and doves papercut comparing hand-cut and laser-cut versions (hand-cut closeup)

…and here is the same section done by laser:

valentine heart and doves papercut comparing hand-cut and laser-cut versions (laser version closeup)

There is one easy way to tell them apart, without even having to look at detailed closeups. The stand-out difference is that the rightmost one is a tiny bit brown, due to smoke in the lasercutting machine. To successfully create a papercut with a laser machine, you quite often have to turn off the ‘air assist’. I might do a separate post one day on why, but the relevance here is that the smoke isn’t blown away as efficiently, so the paper goes a bit toasted.

The other main difference is usually only visible at closer range. It’s that the cutting is a bit more jagged or lumpy in some places. Having said that though, (1) it took me less than an hour to cut this one out by hand, so that explains why some parts aren’t as finished as they could be, (2) there’s nothing to stop me going back and tidying up the sharper angles if I need to.

At very close range it becomes even more obvious which is which. Lasercutting machines work by burning the paper away. So if you see (or smell!) a laser-cut piece of paper it will almost always have toasted edges. They often look like the edges of the cuts are slightly serrated, too, depending on the laser’s settings.

closeup image of a laser-cut valentine card showing two doves in a heart

Compare the laser version above with the handmade version below. The image below doesn’t have the singed brown outlines on the shapes:

closeup image of a hand-cut valentine card showing two doves in a heart

Which version is ‘better’?

I honestly can’t decide, because they both serve different purposes. If I want to do some relaxing, therapeutic papercutting as a hobby, then hand cutting is the way to go. But if I want to turn the artwork into a Valentine card, lasercutting is the best way to do that, otherwise I’d have to charge about £20 per card, which most people aren’t willing to pay. The laser gives me the ability to reproduce papercut artworks (in the same way that painters create prints of their works to put onto cards). So if someone wants one of my designs they can either go for the affordable version or the premium handmade version.

If you’d like to cut this design for yourself, I’ve adapted and created it as an SVG in my shop and Etsy shop.

Posted on Leave a comment

New Hobby: Adventures in Marquetry

Yorkshire rose coaster marquetry project - Kay Vincent - LaserSister

This year (2022) I started a new hobby. I am now a marquetry enthusiast (in addition to all of my other craft addictions).

I moved house in 2021 (from the south to the north of England) during the covid lockdowns, so for a very long time I wasn’t able to start any new hobbies that involved seeing real people. But in February 2022 I was wishing for a new group or club to join in Yorkshire, and discovered that Leeds Marquetry Group were restarting their beginners’ sessions that very same week. So I signed up. And it turns out that marquetry is a brilliant pastime for me, because it seems to combine a lot of the skills that I’ve already been building up via my other crafts, over the years.

Through my papercutting experiments I’ve already learned how to use a scalpel to do some very intricate cutting…

papercut 224 - Chinese flower with horizontal scalpel - Kay Vincent LaserSister

…and through my lasercutting artworks I’ve learned some of the characteristics and limitations of working with different types of wood veneers:

LaserSister trademark logo as laser-cut marquetry heart - background removed

So marquetry basically involves a mash-up of my existing craft skills.

The very first project I completed was a Yorkshire Rose coaster:

Yorkshire rose coaster marquetry project - Kay Vincent - LaserSister

As with my papercutting projects there are quite a few errors that really jump out at me when I look at this piece, but overall I’m really pleased with it. I designed it myself (starting out with petals that were based on heart shapes) then cut it by hand, and there were some really challenging sections in it.

The best thing about Leeds Marquetry Group is that everyone is so friendly and helpful. In just a few months I’ve learned more about cutting, gluing, sanding and varnishing wood than I could have ever learned from books or the internet. I’m looking forward to learning even more, over the next year.

Posted on Leave a comment

Decorative Vector Ornaments: Papercut 087

papercut 087 with pen for scale - Kay Vincent - LaserSister

Decorative Vector Ornaments: Papercut 087

This is papercut 087 of my epic papercutting project (using the “922 Decorative Vector Ornaments” book).  I’m adapting the designs for papercutting, and then practising by cutting out 100 designs in 100 days. Eventually I may may incorporate them in future papercuts that are made by laser and also by hand.

I honestly think I am getting better at this, little by little!

papercut 087 with pen for scale - Kay Vincent - LaserSister

The cut-lines are getting much cleaner. OK, the large circles are still a bit wobbly, but a lot of the other shapes are quite good.

papercut 087 - Kay Vincent - LaserSister

I might admit to cheating a bit, because whereas before I used to say “it would look better up close if I tidied some of the cuts up” — I’m actually tidying the cuts up before I take the photos now 😉

Posted on Leave a comment

Decorative Vector Ornaments: Papercut 086

papercut 086 with pen for scale - Kay Vincent - LaserSister

Decorative Vector Ornaments: Papercut 086

This is papercut 086 of my epic papercutting project (using the “922 Decorative Vector Ornaments” book).  I’m adapting the designs for papercutting, and then practising by cutting out 100 designs in 100 days. Eventually I may may incorporate them in future papercuts that are made by laser and also by hand.

Woo, the cuts on this one are quite crisp…

papercut 086 with pen for scale - Kay Vincent - LaserSister

…even when you look at them up close. And I still had a blunt blade and was basically just hacking away at the paper. I’m quite pleased with this 🙂

papercut 086 - Kay Vincent - LaserSister
Posted on Leave a comment

Decorative Vector Ornaments: Papercut 085

papercut 085 with pen for scale - Kay Vincent - LaserSister

Decorative Vector Ornaments: Papercut 085

This is papercut 085 (only 15 more to go!) of my papercutting project (using the “922 Decorative Vector Ornaments” book.  I am adapting the designs for papercutting, and then practising by cutting out 100 designs in 100 days. Eventually I may may incorporate them in future papercuts that are made by laser and also by hand.)

Because of the many repetitive elements in this design I think it might be one of the designs that would look better if cut by laser.

papercut 085 with pen for scale - Kay Vincent - LaserSister

However, I’m not too disappointed by the hand-cut version. The ‘sun ray’ bits are quite crisp, actually.

papercut 085 - Kay Vincent - LaserSister

As well as the central sun/flower design, I can also see things in this design that remind me of fish.  (Or sharks. Or maybe birds.) When I move onto my next epic papercutting project (of creating all of my own designs from scratch) then I might remember this one, and try to hide some fish or animals in an abstract-looking design.

Posted on Leave a comment

Decorative Vector Ornaments: Papercut 084

papercut 084 with pen for scale - Kay Vincent - LaserSister.JPG

Decorative Vector Ornaments: Papercut 084

This is papercut 084 of my papercutting quest (using the “922 Decorative Vector Ornaments” book, in preparation for incorporating them in future papercuts that are made by laser and also by hand.)

I really like this design, and it didn’t seem to take very long to cut. That reminds me – I must start timing how long the cuts actually take, because I really have no idea how long each design takes to cut. I enjoy the process so much and find it so ‘therapeutic’ that sometimes I can be cutting a really big project and it feels like the time is just flying by. And then other times, of course, I could be fighting with a fiddly design, in fading daylight, and using a blunt blade that I can’t be bothered to change – and in those cases the cuts seem to take forever.

papercut 084 with pen for scale - Kay Vincent - LaserSister.JPG

I’m also getting better at tidying up the cuts before I take close-up photos of them!

papercut 084 - Kay Vincent - LaserSister
Posted on Leave a comment

Decorative Vector Ornaments: Papercut 083

papercut 083 with pen for scale - Kay Vincent - LaserSister.JPG

Decorative Vector Ornaments: Papercut 083

This is papercut 83 of my papercutting quest (using the “922 Decorative Vector Ornaments” book, in preparation for incorporating them in future papercuts that are made by laser and also by hand.)

This is a very simple-looking design, but sometimes they are the hardest ones to make a decent job of cutting…

papercut 083 with pen for scale - Kay Vincent - LaserSister.JPG

…but even close up I think this one actually looks OK. My skills really are (gradually) improving, as I get closer to the end of my 100-day challenge.

papercut 083 - Kay Vincent - LaserSister.JPG
Posted on Leave a comment

Decorative Vector Ornaments: Papercut 082

papercut 082 with pen for scale - Kay Vincent - LaserSister

Decorative Vector Ornaments: Papercut 082

Papercut 082 : Oh dear! I’m in the process of changing over my website host, and have been a week without being able to access my blog.

I’ve moved the old pages and blog posts across to the new host, but there are still a lot of tweaks that I need to make in order to get the site fully working again.

In the meantime, I continued to do my papercuttings every day, so now (belatedly) I am finally able to update the website with my latest papercuttings:

Day 82 of my papercutting adventure (using the “922 Decorative Vector Ornaments” book).

It might not look it, but this was quite a tricky design to cut. The design involved having to leave just tiny links of paper in order to hold the actual physical piece of paper together. So the overall piece got very lacy and delicate towards the end.

papercut 082 with pen for scale - Kay Vincent - LaserSister

I’d cut similar designs to this one earlier on in this project (i.e. even before starting this ‘100 days’ project), but I didn’t really like the results, before. However, now that I’m getting more proficient at cutting by hand (and also at adapting designs so that they can be cut out but still look fairly attractive), the end result is quite close to what I had imagined in the first place:

papercut 082- Kay Vincent - LaserSister

Plus, it’s another art nouveau-style design, so that quite appeals to me, and it also makes any mistakes less obvious because the curves and swirls in the design make it harder to spot.

Posted on Leave a comment

922 Decorative Vector Ornaments: Papercut 081

Decorative Vector Ornaments: Papercut 081

This is papercut 81 of my papercutting adventure (using the “922 Decorative Vector Ornaments” book, in preparation for incorporating them in future papercuts that are made by laser and also by hand.)

I thought this design was going to be a pain in the butt to cut, but it turned out to be quite enjoyable and therapeutic because of the repetition and the challenging aspects to it:

papercut 81 with pen for scale - Kay Vincent - LaserSister

First of all I cut the teeny tiny little dots out. They are approximately 1mm across, so it’s a miracle really that any of them look even vaguely round. Especially since the blade was getting quite blunt by then, so I was having to hack them out of the paper instead of cleanly slice them.

Then I did the sort of stacked-hearts shapes, by cutting the left-hand curves first then rotating the paper so I could move onto the next shape, etc.

And finally I did what should have been the easiest bit, which was the hole in the middle. Which is the bit that turned out looking the most wonky! Never mind – I can always tidy it up later, I suppose:

papercut 81 - Kay Vincent - LaserSister