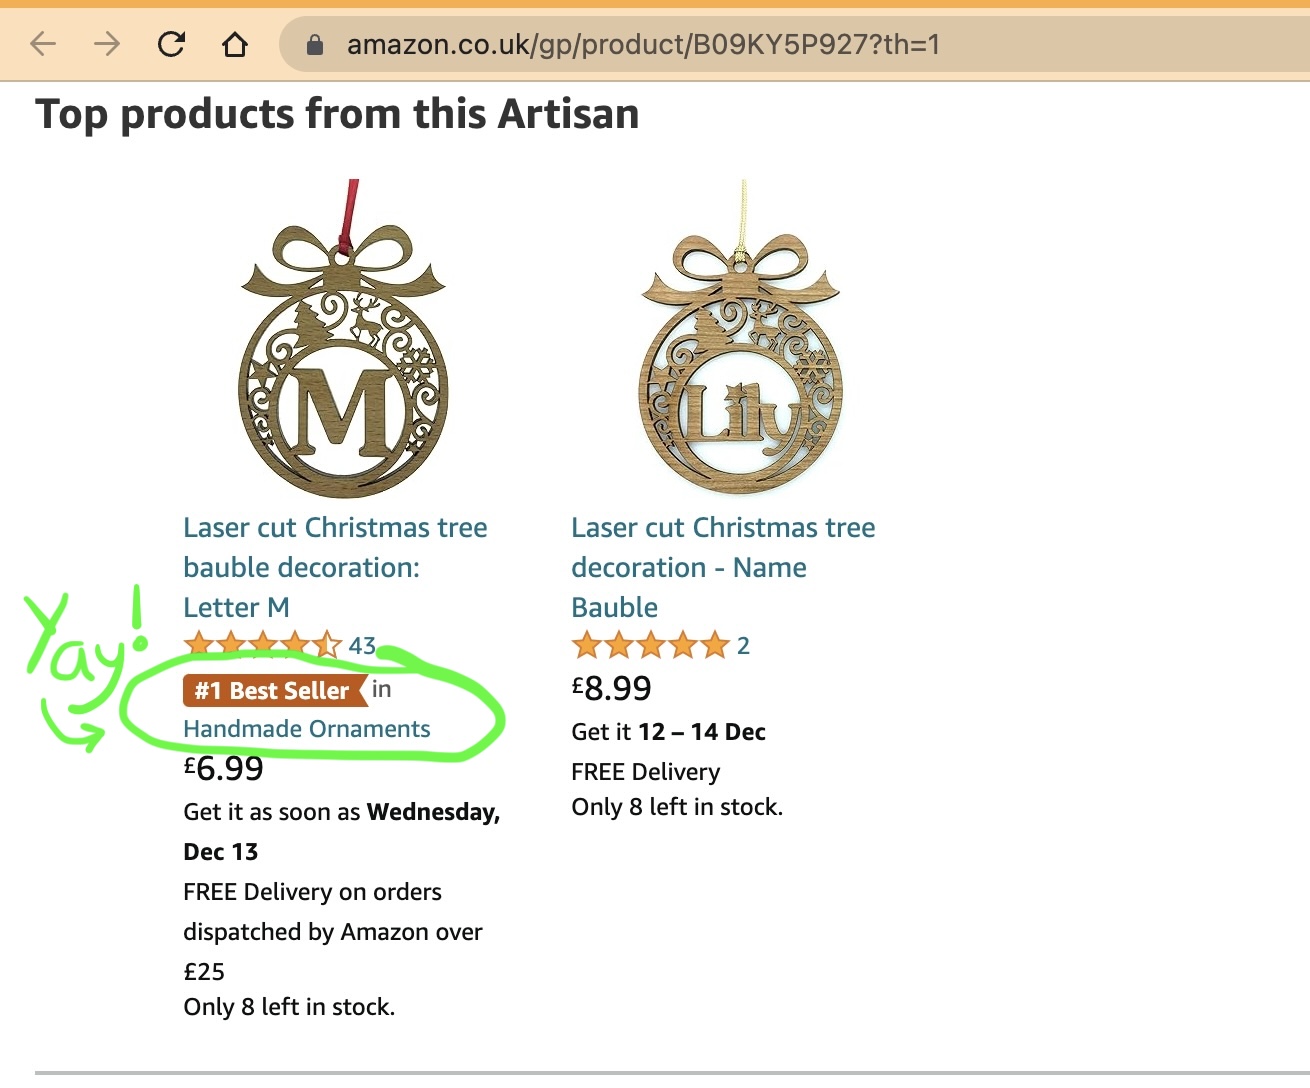
All of the hard work by me and my elves the last few weeks has paid off, and we have scored a Christmas #1 on Amazon!
At the moment when you see the wooden letter baubles on Amazon, they have a little orange flag with them that says “#1 Best Seller”:
I’m really happy about that! But of course, it’s only a Christmas #1 in a sub-sub-sub category of Amazon (i.e. “Handmade Ornaments”), and at the moment it’s still #9 in the “Handmade Products” category:
One day I’d like to get to number 1 in that Handmade Products category. Especially because at the moment #5 in the chart is a joke “million piece jigsaw puzzle”:
I guess people buy those as Secret Santa gifts for colleagues, and I have a strong suspicion that their colleagues would prefer to receive a nice wooden bauble rather than a plastic bag full of sawdust 🙂
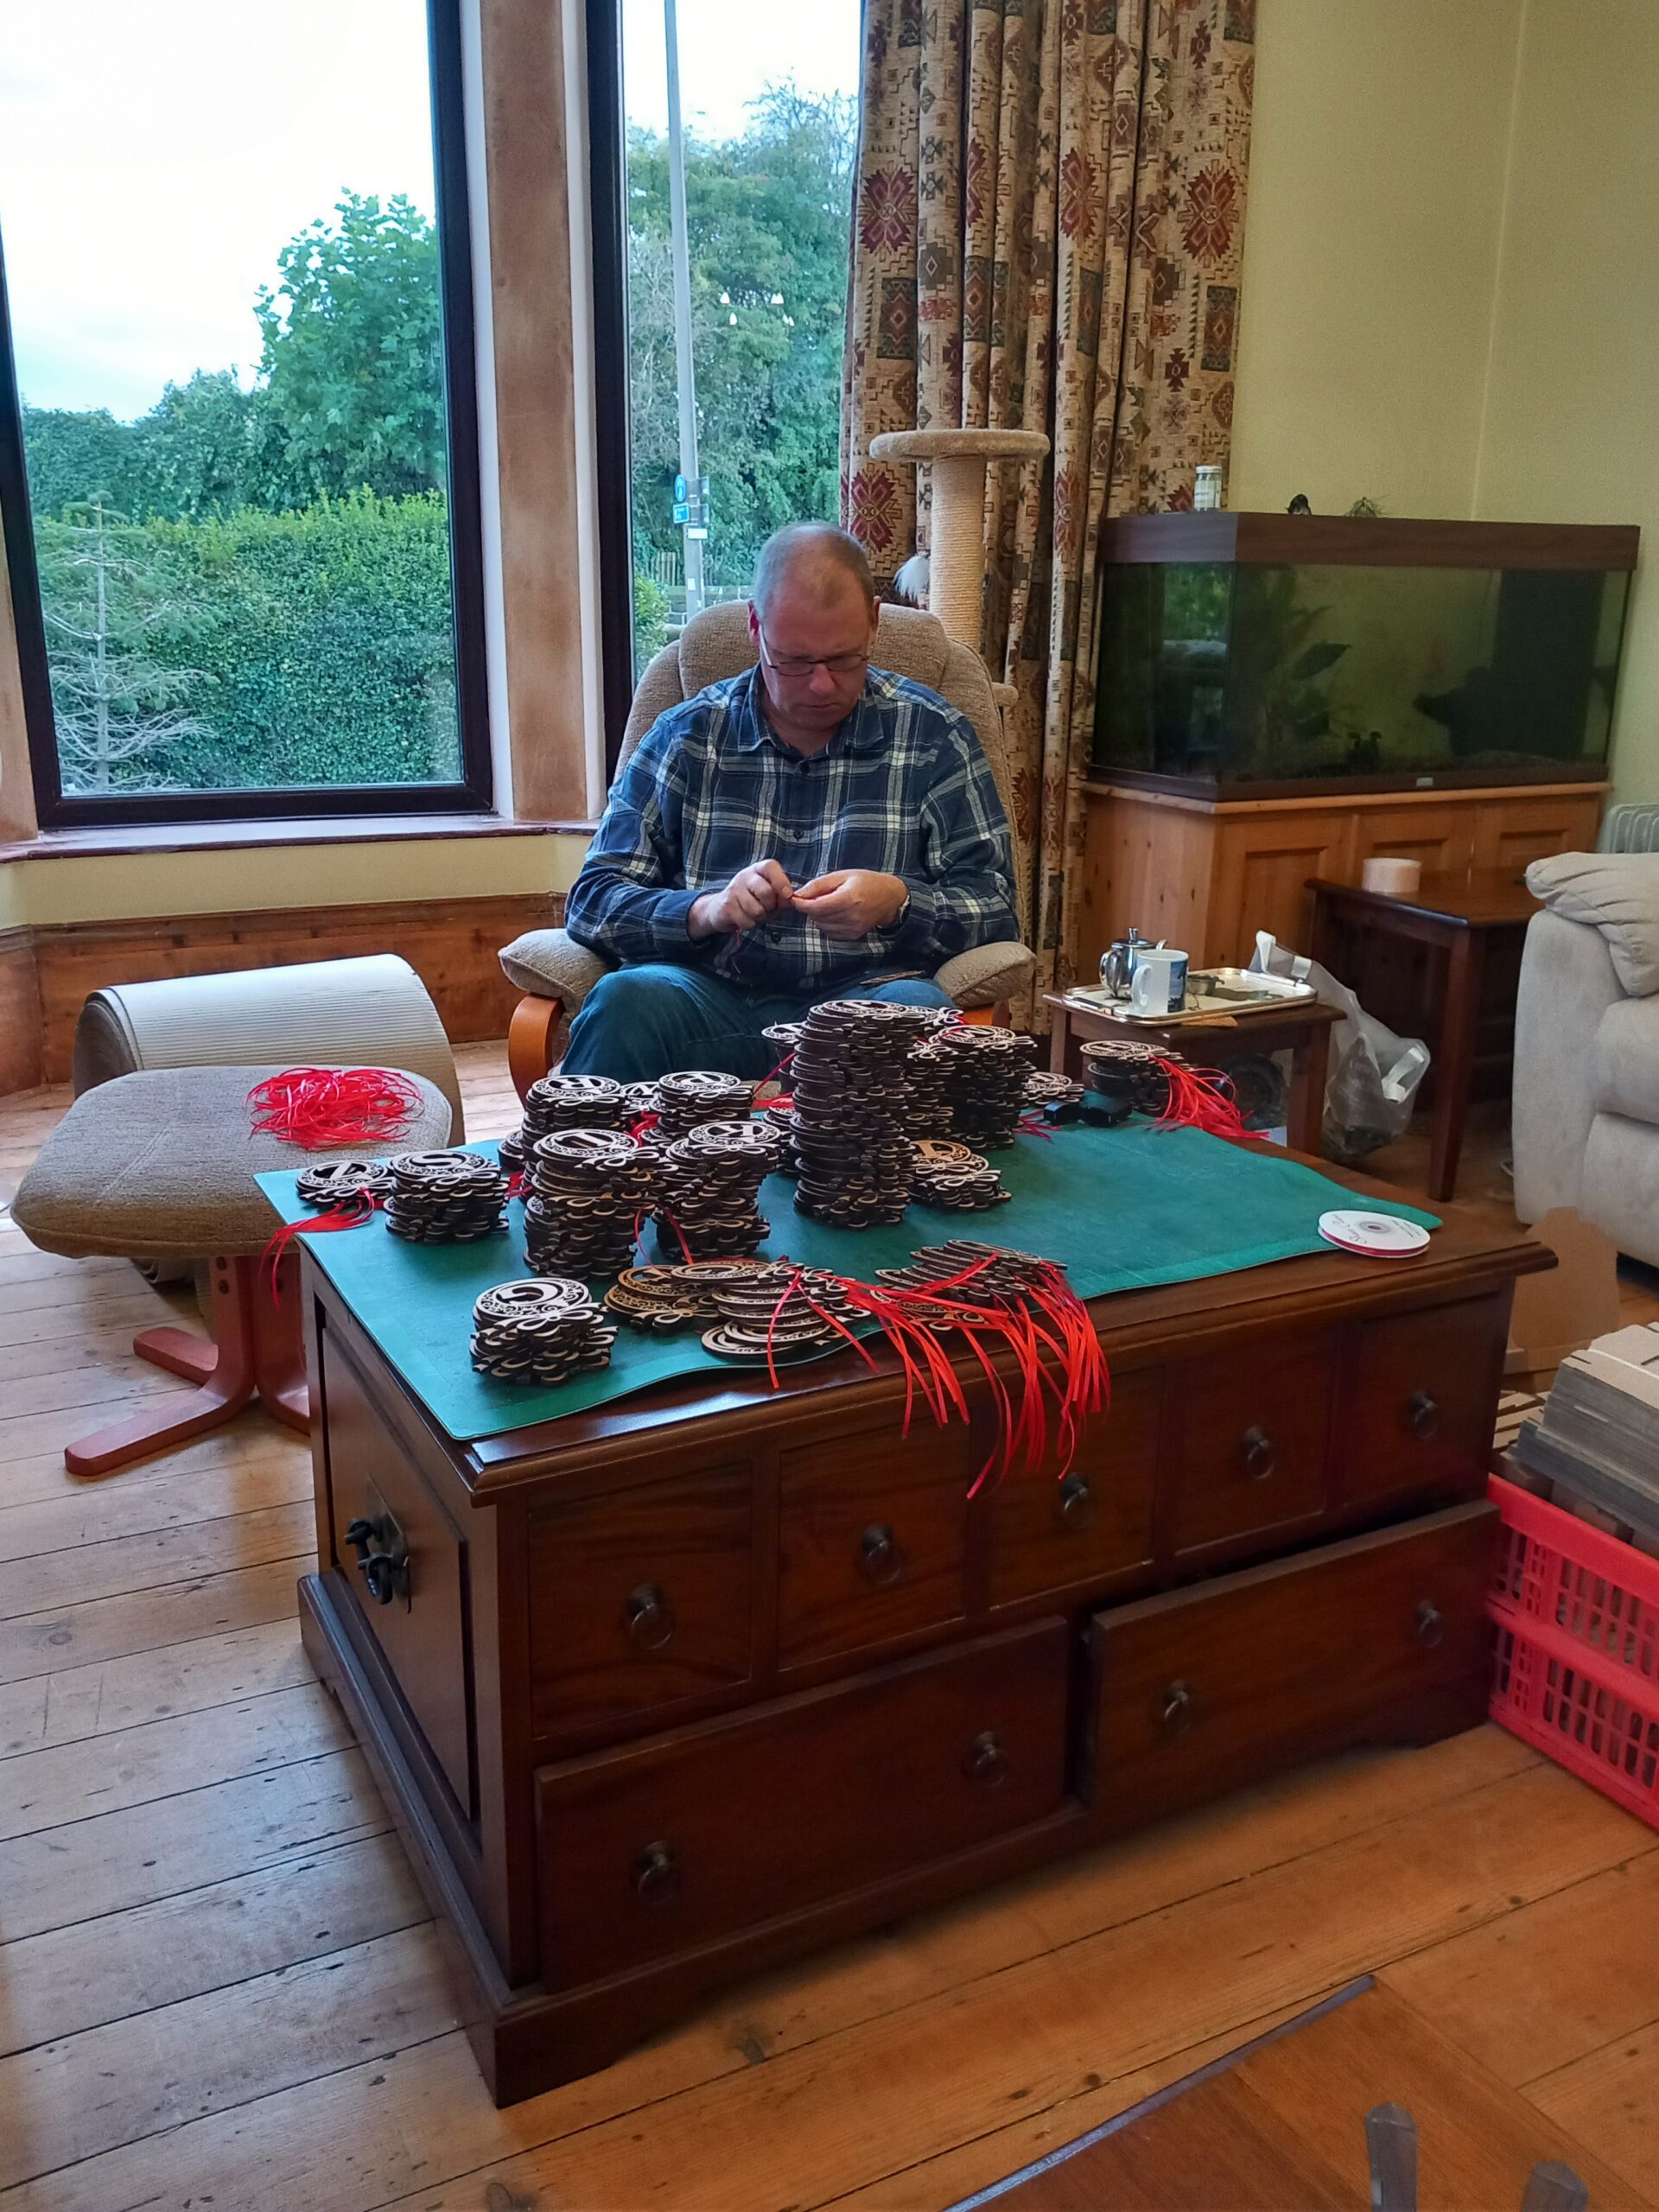
Having a craft business means that the “Christmas rush” starts early. Normally I begin sending boxes of my lasercut gifts off to Amazon in September, but this year my existing lasercutters both broke, so I had to order a new one – but it couldn’t be delivered until mid-October. Since then I’ve been frantically trying to catch up with my cutting schedule, making alphabet baubles:
This is what I look like for most of the day at the moment:
However there’s so much to do that it’s not just my Laser Lair that gets full of baubles. The rest of the house becomes part of my little factory…and the rest of my family become my little Christmas factory elves. Here is one of them putting ribbons in the baubles:
LaserSister factory elf #1
…and here are two more making up boxes and putting the labels on them:
LaserSister Christmas factory elves #2&3
Hopefully we’ll get all of them sent off to Amazon in time for the Christmas rush!
Click here to see if I managed to get them to the warehouse on time, or if they are sold out. (The link shoud go to my Amazon Handmade page, so you can get a live view of the baubles.)
Am I the first person in the world who is barmy enough to hand-cut a marquetry QR code pattern?
More photos (and text) to follow – because I haven’t actually finished this project yet – but this is the current status of my marquetry/parquetry QR code project.
DISASTER!
It took me about 10 solid hours to get as far as I did with the pattern below, but then I had a disaster. I discovered that some free QR code generators are AWFUL, and take you to an intermediate site first. So if I used the pattern below, anyone viewing it would not be sent straight to my website but would be sent to a confusing ad-filled page first, and might not even realise how to access my website. So I had wasted 10 hours.
(On the other hand I’m fairly sure that most people would describe even a successful parquetry QR code as a waste of 10 hours anyway.)
Where the idea came from
I joined the Leeds Marquetry Group in 2022 and am really enjoying learning different marquetry skills. One of the recent club projects involved creating parquetry (using wood veneer pieces to create geometric patterns). First I hated parquetry, but now I’m getting a bit obsessed with it.
parquetry box in progress
The idea for this QR code project surfaced because I wanted to cover a small box with a marquetry design, but because the box had a hinged lid it meant that whatever design I chose, there would be a line running all the way across it where the box and lid met.
So I wanted a design that would include a horizontal line in it, which would disguise the line in the box. Because I’d recently been working on parquetry designs I thought about doing a checkerboard-effect pattern, but the box’s dimensions didn’t divide up neatly into either centimetres or inches, so for some reason that annoyed me and I gave up on that idea. I also wasn’t sure I’d be able to cut lots of tiny squares so precisely that they would fit together without going a bit wonky. I did a bit of Googling of ideas for marquetry on small boxes, and discovered Tunbridge ware patterns, where the design looks like tiny little mosaic pieces, and is created by bunching long slivers of wood together. I loved that idea, but unfortunately don’t yet have the equipment or skills to create any myself. But it sparked a stupid idea in my head, of creating a micro mosaic marquetry pattern, using squares of veneer that were less than 2mm square. I’ve no idea why that thought appealed to me when I’d already rejected the idea of making checkerboard pieces that would have been about 5mm wide.
The next challenge was to think of an actual design for the micro mosaic. I did a bit more Googling of micro mosaic marquetry patterns, but all of that staring at little squares suddenly made a link in my head; the tiny square dots were like the ones that make up a QR code (where you can point a smartphone at the code and it will lead you to a specific website). The idea of making a parquetry QR code was so ridiculous and seemed like such a difficult challenge…and yet it didn’t seem impossible. I mean, “all” I would have to do is cut hundreds of tiny squares of wood veneer so accurately that when I arranged them in the overall design it would be recognised by smartphones as an actual QR code.
A quick online search for “free QR code generators” brought up several – e.g. like the QR code generator by Adobe Express. I created a QR code for my overall website (LaserSister.com), then imported the resulting pattern into CorelDraw so that I could change the size. I wanted to put the code onto the side of my box, so it needed to measure no more than 50mm across.
Before I started I didn’t know how many squares make up a QR code. If I’d have stopped to think about it, I would probably have guessed they were about 20 squares across/down. And then if I’d thought about it for a bit longer, I would have realised that 20×20 = 400, so I’d need to cut a minimum of 400 squares. Fortunately I skipped that thinking stage, otherwise I might not have bothered with the project. Because when I printed the code it turned out that it was actually 29×29 squares. Which is 841 squares. Worse than that was the fact that I needed the code to measure no more than 50mm across. If I’d then bothered to divide 50 by 29, I would have realised that each veneer square would need to be no more than 1.724mm across.
Fortunately I got so carried away with the practicalities of printing off the pattern and applying it to my cutting mat with sticky-backed plastic that I didn’t think about the size (or number) of the little squares until the time came to start cutting them out.