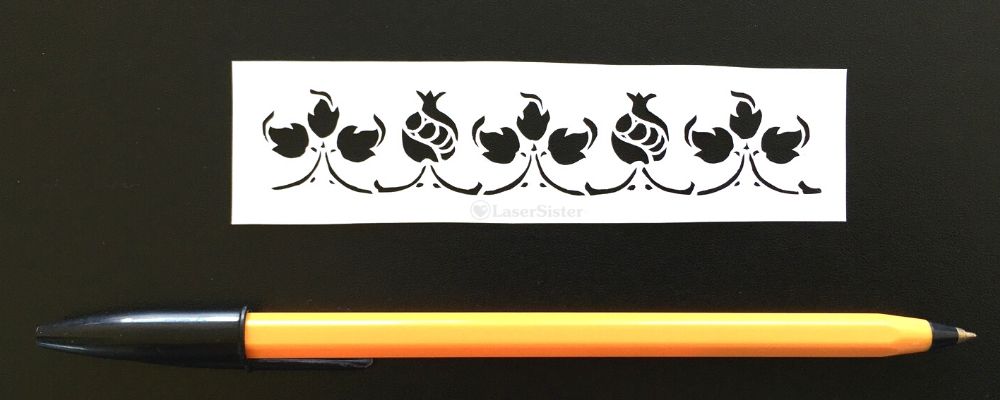
Pomegranate and Leaves Papercut – From Decorative Vector Ornaments Book
The ‘Pomegranate and Leaves’ papercut design is from an ongoing papercutting project that I’ve been doing, for the last couple of years(!) I’m trying to adapt and cut all of the designs in the book “922 Decorative Vector Ornaments“. I’ve forgotten why I even wanted to do it, now, but I’ve got so far into it that I might as well continue 🙂
(Some of the links in this article are affiliate links. If you’d like to know more, please check out the small print page…)
The book doesn’t have titles for any of the designs, so I’ve called no# 708 “Pomegranate and Leaves”.
Closer up:
This design has got some extremely tiny shapes to cut out, and they were a real challenge. Some are only a little bit bigger than a pinprick:
I really do need to count up how many of these designs I’ve cut now, but I think it’s close to 400. And with each one I feel like I’m getting just a bit more confident and competent at cutting. I’m also getting better at adapting images so that I can make papercuttings from them.
I particularly enjoyed adapting and cutting this piece, because it’s got the traditional floral shapes of an Art Nouveau design. The curves of the leaves appeal to me, as well as the stylised pomegranates (at least, I think that’s what they are!) I can definitely see myself using some of the elements of this design in a future project.
While I was cutting it I was (half-)watching Cake Walk on Amazon Prime (Amazon Prime might still have a free 30-day trial if you haven’t tried it already).
Cake Walk really is a guilty pleasure for me – the finished cake designs don’t always look 100% professional, but I just enjoy watching the processes that the contestants go through. And I suppose I feel a bit of camaraderie with them as well, because when the Zombie Apocalypse inevitably comes, then it will turn out that cake designing and papercutting will both be among the least useful hobbies that people could have spent their time on…
Any comments about the design or the cutting (or my taste in TV shows)? You can chip in via the comments page, or Facebook, Twitter, LinkedIn or Instagram.
(Some of the links in this article are ‘affiliate links’. If you’d like to know more, please check out the small print page…)
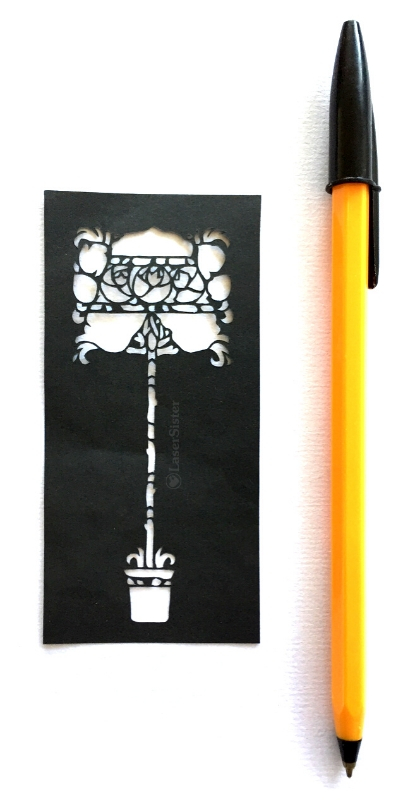
The design is number 122 in the book. (Because the designs don’t have names, I’ve come up with my own title of ‘standard rosebush’. (‘Standard’ = ‘tree-shaped rosebush on a long stem’ as opposed to ‘common/boring rosebush’).
I really like this design:
Closer up:
For once I don’t think I’ve got any really obvious ‘snags’ in it, that draw my eye away towards errors rather than towards the overall design. Instead I just enjoy looking at the shapes of the flowers and stem, and marvelling at how the heck I’d managed to cut such thin lines:
Closest up:
Even though I really like this design, I’m not sure I can think of an occasion when I might use it in future. However, I’m glad that this series of papercutting projects has caused me to cut it.
It took over two hours to cut, and I was listening to the audiobook version of Lucy Hounsom’s Starborn book at the time.
I’ve no idea how many of the designs I’ve managed to cut from the ‘922 Vector Ornaments’ book, yet. I’ll have to do a count-up soon, because I think I might be close to halfway…
As mentioned in a previous post, when we visited the lovely English town of Nantwich, we couldn’t find any fridge magnets there. And as I also said last week, I think fridge magnets are a superior form of souvenir. (They take up less space than commemorative mugs, for a start). So I had a look back through the photos from our visit, and invented…a Nantwich fridge magnet design:
Below is one of my photos from our visit. Nantwich has such picturesque houses that I hardly needed to make any changes to the image. For the magnet’s design I added a heart for extra cuteness, but that was more or less it!
I was so pleased with the end result that I tried the design as a souvenir keyring as well…
So if you’re visiting Nantwich and also happen to be a fridge magnet fan (and depending on whether they still have any in stock), you should hopefully now be able to find one at Nantwich Museum. In fact I like the design so much I’m going to put one on my own fridge 🙂
The museum itself had some really unusual local history features – e.g. how Cheshire cheese was (and is) made. Plus, of course, the story behind those iconic black-and-white buildings around the town.
This ‘Fleurs de Lys Border’ papercut is from the continuing papercutting project that I’ve been doing. (I’m trying to adapt and cut my way through all of the designs in the “922 Decorative Vector Ornaments” book by Dover Books, and so have got 922 little papercutting projects to work on.)
(Some of the links in this article are ‘affiliate links’. If you’d like to know more, please check out the small print page…)
The design is number 126 in the book.
It was relatively straightforward to cut, and would make a nice border for a project, or even a suitable crown for a king in a fantasy image.
Closer up:
Close up it’s a bit more obvious that the little shapes aren’t symmetrical, but as I go along with these projects they really are teaching me things. (Like how not to hate that I’ve cut imperfect shapes and then let other people see them.) Instead I’m getting much more relaxed about enjoying them for the cutting process in itself, and then the very fact that they are slightly wonky.
What I especially like about this design is that I could cut the pointy tops of the fleur-de-lys shapes in just a single snip, thanks to my fantastic accidentally-damaged scissors.
A few years ago I bought a pair of scissors, with the intention of using them especially for papercutting. I got them from Ernest Wright & Son Ltd, because I wanted really good quality, and the city of Sheffield has been associated with producing cutlery and scissors for centuries. The scissors came with a protective case and a little certificate:
They were brilliant. So sharp, so precise, so capable of cutting tiny detailed shapes.
…and then in the first week of owning them, I managed to drop them. Onto a concrete floor. Point-downward.
I said a very rude swearword.
My poor, expensive scissors (if that’s not an oxymoron) were irretrievably bent:
But then I tried to use them. And discovered that I had invented The Best Pair of Papercutting Scissors Ever. They cut tiny little curved shapes!
I have now had them for several years and they’re still really sharp. But I’ve got no idea if I’ll ever be able to get them sharpened. I might ask the makers, actually, to see if they’re up for a challenge. In the meantime, I can cut the little curved tops of the fleur de lys shapes above in just one snip.
Have you had any serendipitous disasters-that-turned-out-to-be-triumphs? You can chip in via the comments page, or Facebook, Twitter, LinkedIn or Instagram.
Even on holiday I always have my eye out for laser-y items. And better still if they happen to come in the form of my favourite souvenir…which is a fridge magnet. I like laser-cut fridge magnets so much that I’ve created a special category for them here. So last week when we were on holiday in Porto I was very happy to find a laser-cut fridge magnet.
Laser-cut ‘Porto’ fridge magnet
I think this one shows the river and the Dom Luís I Bridge and the city very well. The typical rabelo boat (carrying its barrels down the Douro river) sort of gets lost in the background – but then compensates by physically standing out from the flat surface. (I’m not sure how the boat could be made to stand out better – maybe cut it from darker wood?) I couldn’t see any details of the artist or manufacturer, but if you know who it is, please let me know and I’ll credit them here.
Closer up:
Here’s the fridge magnet from a different angle – looking straight down at it:
The boat shows up a bit better in this one, but the Dom Luís I Bridge still looks like the star of the show. Mind you, it is a very impressive bridge! And it definitely does stand out in real life. Apparently it was designed by a student of Gustave Eiffel (as in the Eiffel Tower).
The picture is missing one of the key features of the bridge, though, because in real life it’s got two different levels for the different modes of transport across it. Top level: get a Metro tram-thing across the top of the bridge (or walk across as a pedestrian). Lower level: use the road for a car or bike (or walk across that one, as well).
Anyhoo – I like my new fridge magnet, even if it uses quite a bit of ‘artistic licence’. I like the way that they’ve made it into a serrated stamp-shape as well. It just screamed ‘souvenir!’ at me, so that’s another reason I chose it. And now I’ve got another laser-cut piece of artwork on my fridge door, plus some lovely memories of our holiday in Porto/Oporto.
In the meantime I’ve been having laser-cut-fridge-magnet adventures of my own, but more about that later…
This design is from my ongoing papercutting project (where I’m trying to work my way through all of the designs in the “922 Decorative Vector Ornaments” book.) It’s a fairly simple flower-and-fleur-de-lys papercut design, and this one is number 703 in the book.
(Some of the links in this article are affiliate links. If you’d like to know more, please check out the small print page…)
I still need to cut the square edges more so it’s symmetrical, but on the whole I think I did an OK job:
Closer up:
Even close up I’m quite satisfied with the cutting of this one, for a change. The lines aren’t too jagged, the straight bits are straight, and the curved sections are curved.
It’s a nice simple design, and I like the heraldic-looking elements. I can see myself using parts of this design in future projects.
While I did the cutting I was listening to Sarah Pascoe’s Sex, Power, Money (as an audiobook). Very interesting book. It’s not actually the sort of book I would usually read or listen to, but I’ve been binge-listening to so many audiobooks recently that I’ve run out of my normal reading matter. It’s definitely opened my eyes (or ears, I suppose!) to a lot of issues…
So what started out as a therapeutic papercutting project, ended up including some interesting lessons in human nature as well.
Here is a lasercut sugar skull pendant – Happy Halloween!
OK, sugar skulls are traditionally more of a ‘Day of the Dead‘ thing than Halloween, but what the heck 🙂
Lasercutters: Can’t be bothered to design your own sugar skull? Why not buy a licence to use someone else’s design? (That link above is to a post I wrote a while ago, about why and how you can fast-forward your lasercutting business by using stock images and designs.)
That’s actually what I did in this case. The design is brilliant and so detailed, and etches really well – so why re-invent the wheel? I bought the extended licence and now I am able to cut and sell this design in my own business. As well as Halloween lasercut sugar skull pendants and earrings, I’m also hoping to adapt it into a papercut version. That might take a while though. Maybe by next Halloween…
I got this particular sugar skull design from Vectorstock (that’s an affiliate link, by the way. Not that I’ve yet made any money from any of my affiliate links, but they are only a minor part of this blog – I just enjoy sharing (and discovering) lasercutting skills and news!)
The best thing about clear acrylic jewellery is that it goes with anything! It’s like wearing a chameleon. Hmm. I might make one of those, one day…
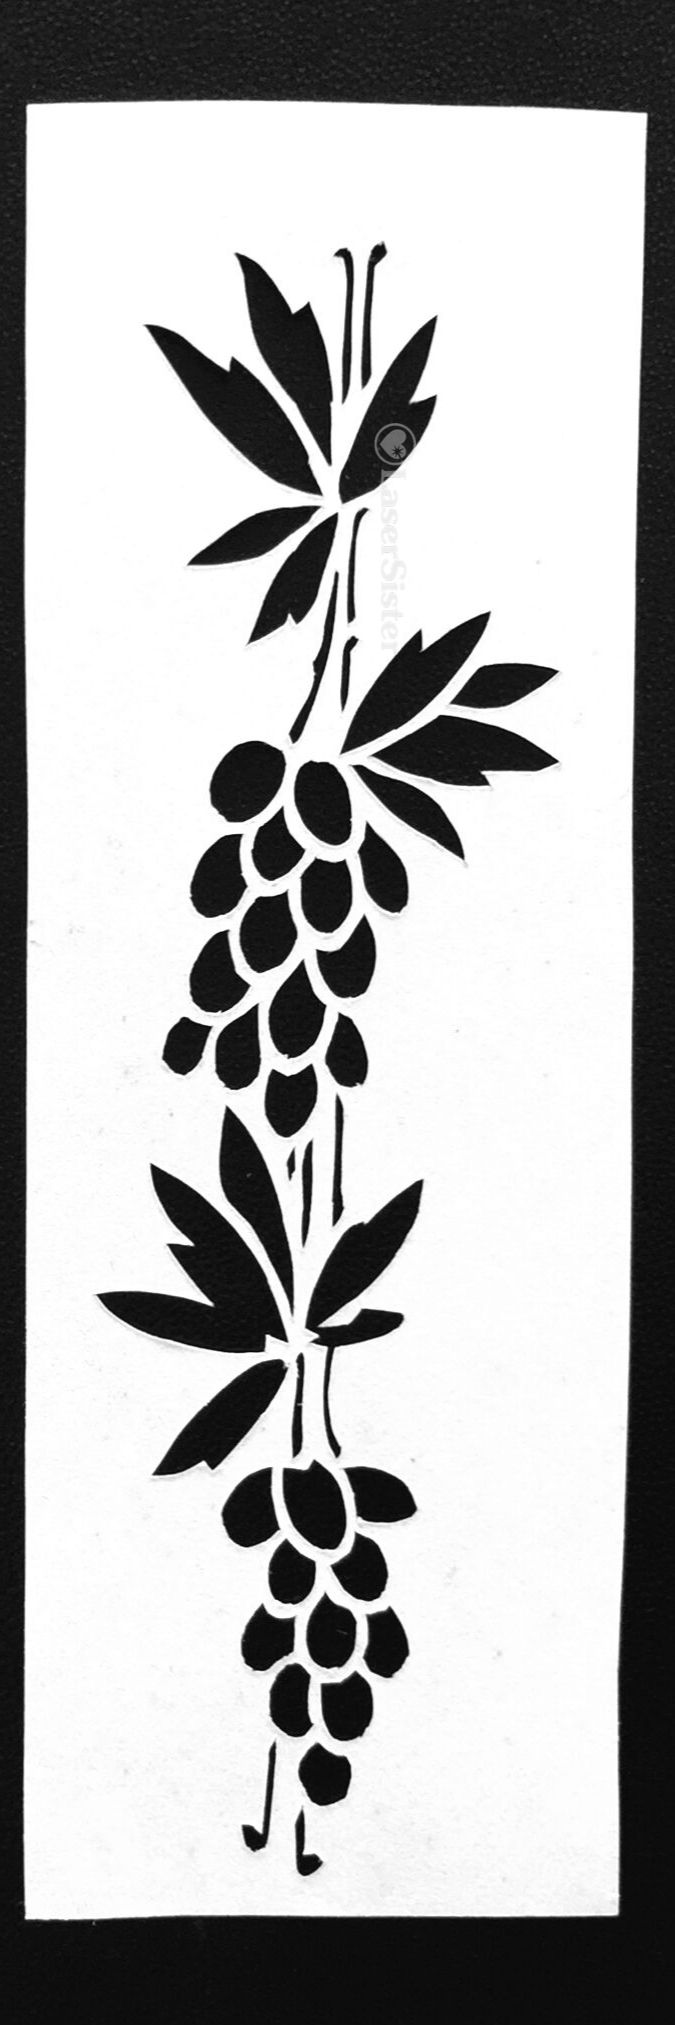
(Continuing my papercutting project – trying to adapt and hand-cut projects based on all of the designs in “922 Decorative Vector Ornaments” by Dover Books.) None of the designs in the book have names, they just have numbers. So because this design looks like a couple of bunches of grapes and a dangly vine-y thing, I’ve naturally called it “Grapes and Vine”.
(Note: some of the links below are affiliate links. If you’d like to find out more then please check out my policies page.)
Grapes and Vine Papercutting K726
Design number 726 in the book was a challenge. (Sorry about the out-of-focus image, by the way. I’ll try to take a better version one day, but at least the closeup version is OK.) It’s got very very thin lines to cut for the vine-y bits, and then lots of very small, very curved sections (i.e. the grape-looking bits). I tackled these with a new scalpel blade, because by now I have got enough experience in papercutting to know that small round objects and thin lines should automatically make me reach for a fresh blade.
Closer up:
Even Closer up
I did tidy the design up a bit after I’d cut it, and overall I’m quite pleased with it. However, when you look at it really close up, you can see the places on most of the grapes where I’ve changed position of the blade or paper mid-cut. (See below, circled in red…):
The perfectionist in me obviously doesn’t like this. And yet the positive, celebratory, skill-learning, “evolving” person in me is very pleased that there are a couple of grapes where this effect isn’t as noticeable. (Plus this is VERY close up, and probably not even noticeable in ‘real life’!)
But the skill-learning, “evolving” person in me is also wondering if it is possible to improve my technique even more. If I keep practising and learning about papercutting techniques, might I eventually get to a stage where I can cut pieces without these little blips showing?
I think it would feel very satisfying to know that I had the skills to cut a ‘perfect’ design.
On the other hand, a laser cutting machine can already cut everything perfectly – and also much more quickly – and so is there any point in me trying to be perfect? And what if it looked perfect this close up, but then at a further level of magnification there were still some flaws that showed up? Where should I draw the line?!
OK – I think I’ve come to a conclusion. I am going to aim for “excellent” rather than “perfect”. Because perfection, as I’ve just realised above, is impossible anyway. There will always be one further magnification that can show more errors.
Mind you, what does “excellent” mean? Oh dear. Here we go again…
Do you have any advice about improving my cutting (e.g. to avoid making those little marks when I change the position of the paper or the blade)? You can chip in via the comments page, or Facebook, Twitter, LinkedIn or Instagram.
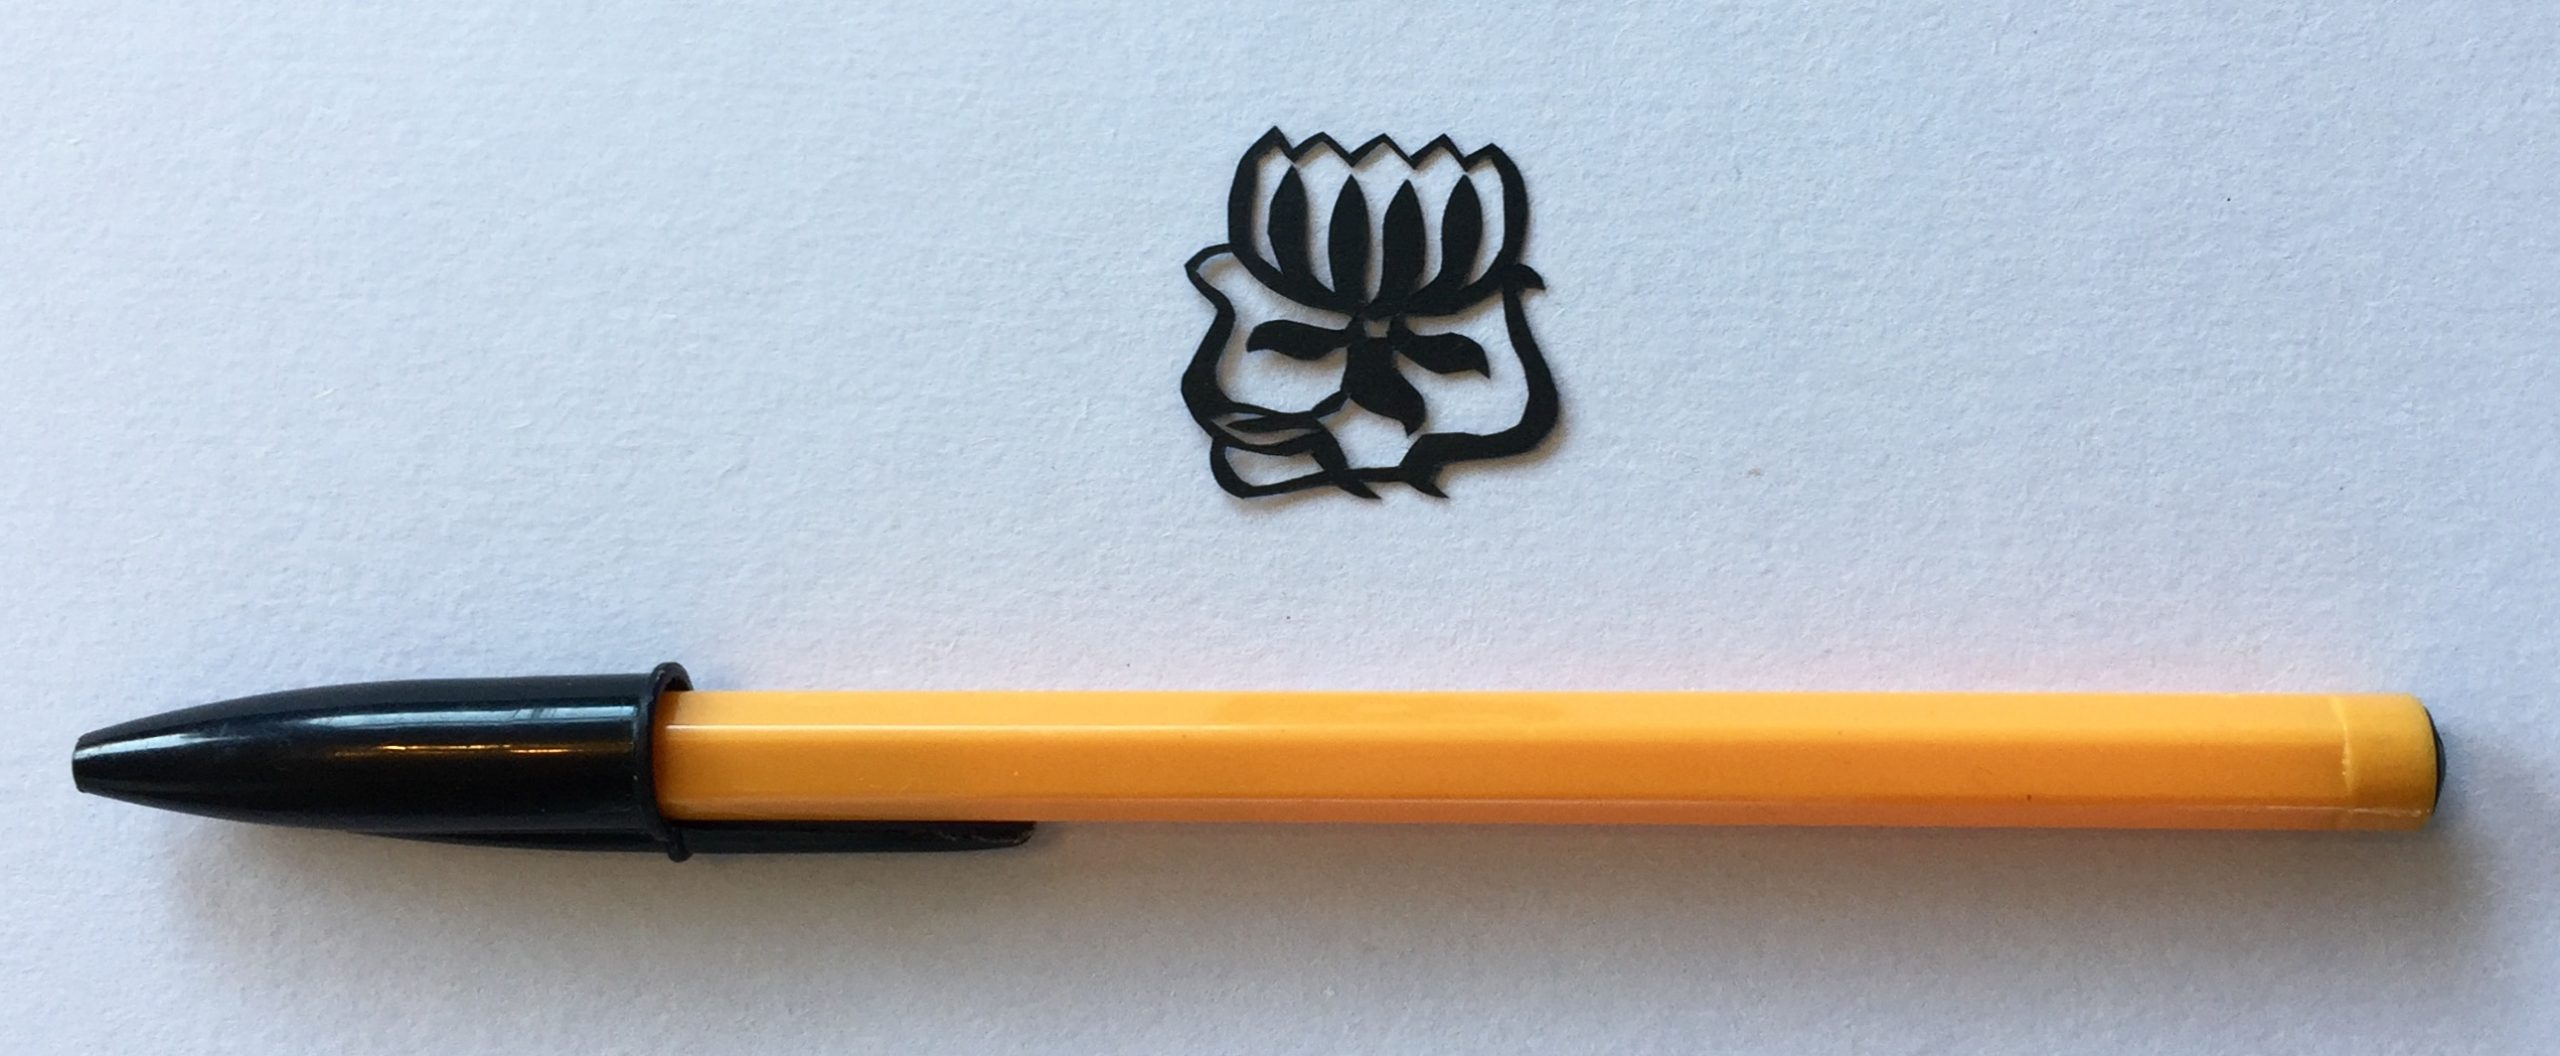
(Still working on the papercutting project where I’m adapting and hand-cutting my way through the designs in the “922 Decorative Vector Ornaments” book.) I’ve called this one “Art Nouveau Waterlily Flower” but as I explain below, I’m not 100% convinced that it actually is a waterlily…
(Note: some of the links below are affiliate links. If you’d like to find out more then please check out my policies page.)
Art Nouveau Waterlily Flower Papercutting K118
Design number 118 in the book is a nice little waterlily. Or maybe a lotus flower. Or some other flower. Now that I look at it again, I’m not convinced it’s a waterlily because waterlily leaves are the classic ‘lily pads’ that frogs sit on, aren’t they? Whereas these leaves are small and pointy (or long and sinuous). Oh well, maybe I could convince myself that it’s a waterlily if I think that the little pointy bits are its roots, and the long sinuous bits are representations of the water that the flower is sitting in.
I did tidy the design up a bit after I’d cut it, but it’s a bit ‘lumpy’ in places. Overall though, I really like this one. I can definitely see myself using it in a future project as part of a design.
Closer up:
I cut this one while listening to Mark Dawson’s Self Publishing Show podcast (previously the Self Publishing Formula show). Very useful information!
Any comments about the design (like what the heck kind of flower it is), or advice about improving my cutting? You can chip in via the comments page, or Facebook, Twitter, LinkedIn or Instagram.
What is a “sprue”, and why should I use sprues with my lasercutting designs?
(This is another article in “Money-Saving Lasercutting Tips” – a free tutorial series that demonstrates effective and efficient lasercutting techniques. Tip #3 is all about those awful moments when you watch your precision-cut laser pieces drop down into the guts of the machine … and how to avoid those moments in future.)
Definition of a sprue
Sprues are most commonly seen in injection-moulded plastic toys. For a fuller description check out the Wikipedia definition, but briefly:
In the image below, there are little links that connect the plastic toy components to the frame. These are the sprues. They are created as part of the moulding process, but the useful secondary function of sprues is that they hold the components securely in position within the plastic frame, until you twist or cut the components out. So below, the pieces stay safely in place until the user needs them, rather than rattling around in a box or falling on the floor and getting lost.
Why do I need to use sprues when I’m cutting with a laser?
In laser cutting projects, you often need to cut light materials such as paper or card. But because the machines often blow and/or suck air during the cutting process, it’s very easy for a lovely piece of personalised wedding card to just fly away while you look on in horror.
It’s also really common to need to cut very small pieces from plastic or wood. But if they are smaller than the holes in the cutting bed of the laser machine, the pieces often fall through the holes as they have been cut. Then you either have to fish the pieces out of the cutting bed, or cut them again. This can potentially be a big waste of time and money.
Oh no! Where have three of my little circles gone?
This will happen to all lasercutter users at least once, but not everyone knows what to do to avoid it.
It might seem like it doesn’t matter very much because they are only tiny pieces and you can always cut more of them. But in the example image above I have lost 75% of my pieces. And what started out as a cutting job of only a few seconds, has now turned into either a search-and-rescue mission to retrieve the three little circles, or a waste of more time and material because I need to cut more pieces.
So we therefore need a way to cut the pieces that automatically stops them falling down or blowing away.
One solution is to use sprues, and to include them in the cutting design right from the start.
When to Use Sprues
Generally speaking, use sprues if the piece to be cut is less than 1cm squared, and anytime you are cutting a design from a piece of paper.
How to Design Sprues
You can create sprues very quickly and easily in most vector-based drawing software (e.g. Photoshop or CorelDraw). I happen to use CorelDraw, but the principles are the same for most other apps/programs.
For most lasercutting projects, a sprue is just going to be a small break in the cutting line. It should be:
Big enough that the cut piece remains connected to the paper/wood/plastic
Small enough that the cut piece can be pulled or pushed out of the sheet of paper/wood/plastic by hand
There are two main ways to create them. The first is to ‘manually’ make a tiny break in the cutting line, and the second is to use the Weld function to make the break.
Method 1: Make a ‘manual’ break in the cutting line
Step 1) Make sure that you can edit curves and manipulate/add nodes on the cutting path of the design. (In CorelDraw the “Shape Tool” lets you do this.)
Note: If you can’t see any nodes to edit, you may need to convert the shape to curves first (e.g. by right-clicking the mouse and selecting “Convert to Curves”):
2) Zoom in really close to the object (e.g. so that a 3mm line fills the whole screen), then add two new nodes as close to an existing node as you can manage:
3): Select the middle node of the group of three nodes, then break the path of the curve. (e.g. by right-clicking and choosing “Break Apart”):
Screenshot from CorelDraw: breaking a curve
4) That middle node should have broken in two, so take one of the two resulting nodes and drag it about half a millimetre outside the curve. Then do the same for the other new node. This creates a small break in the cutting line, so that when you cut the piece it should now remain fixed in place until you’re ready to push or tear it from the material you were cutting.
Screenshot from CorelDraw with broken curve zoomed in
Screenshot of object with sprue at the top
5) Use the laser cutter to cut out the shape.
The object can now be pushed or pulled out of the sheet of material that it was cut from.
(You may need a knife or scissors to help cut it free, and a file or blade to cut off any extra material left over.)
Extra material at the top of the flower can be cut off with scissors
Conclusion
Using sprues helps laser cutters to save time, money, and annoyance. Instead of wailing in anguish as you watch another tiny precision-cut object fly away or disappear down a hole, consider using this little ‘design hack’ to avoid those problems.
Basically, whenever you’re lasercutting and you think “tiny” or “paper”, you should also think, “use sprues!”
I hope you found this article useful.
Method 2 (using the ‘Weld’ function to create sprues) is coming up later, but in the meantime if you have any comments or questions, please feel free to share them in the comments section or via the contact form.